Some of the old devices might have started to get an error 'mmc_read failed' and fails to boot randomly. As the time goes by, this issue becomes more prominent and makes the device completely useless.
The error looks as follows:
Could not do normal boot.
ddi : mmc_read failed
ODIN MODE (HIGH SPEED)
PRODUCT NAME: SM-N9100
CURRENT BINARY: Samsung Official
SYSTEM STATUS: Custom
REACTIVATION LOCK: Off
KNOX WARRANTY VOID: 0x1 (0)
QUALCOM SECUREBOOT: ENABLE (CSB)
RP SWREV: S1, T1, R1, A1, P1
SECURE DOWNLOAD : ENABLE
UDC START
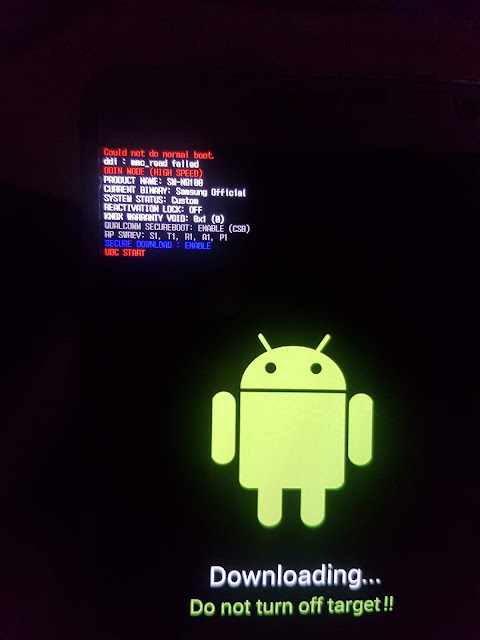 |
| 'mmc_read failed' error in Download mode |
Note: The PRODUCT NAME and RP SWREV changes based on the different Galaxy Note 4 models or other phone models
The symptoms of a mmc read fail are:
- Phone goes directly to download mode by switching it on
- Displays the error message 'ddi : mmc_read failed' in the Download mode
- Randomly boots to the Android
- Doesn't boot into recovery(Stock or Custom like TWRP)
- No indication of charging while plugged to a charger when phone is switched off
- Heavy battery drain in some cases
- Restarts often
- Phone doesn't boot even after pressing the power button. Need to remove the battery for some good 15 to 20 minutes and then insert it and switch on to at least boot into download mode
- Flashing stock or custom ROMs in the download mode via ODIN always fails
- Gets 'No PIT Partition found' error while flashing things like recovery, boot img, etc via ODIN
- As it gets worse, the phone stops booting completely and becomes useless but can be used as a paper weight
Fix:
Warning: This fix works for most devices when done by exactly following the steps with patience and concentration. Do at your own risk.
This fix is not related to the software but to the hardware itself. Don't get scared as it is just a small fix but needs patience and concentration to make it done!.
The mmc_read fail error arises due to few reasons but more than 90% of the cause would be that the processor cannot read the emmc chip due to poor contacts. So we gonna fix this issue by forcing the chip to make a tight contact with its terminals so that the processor can read data from the chip.
Lets get started 👍
1. Remove the battery and the back case.
2. There are totally 16 screws and remove all of them and store them carefully somewhere. There would be a screw which usually hidden under a sticker as pointed in the below image. Make sure to unscrew it as well.
3. Push the screen gently and slowly from the battery compartment of the phone as shown in the below image. The screen would pop out on the other side. Use a credit card to cut all the adhesive strings. Repeat this with patience and concentration all over the battery compartment to remove the screen completely. A razor blade may also be used to cut the adhesive strings that are strong.
Do not insert the credit card or blade between the screen and the electronic chip board sticking to it as it may break down the electronic connections.
4. Once the screen is removed off from the back case, the interior of the phone looks like as shown in the below image. In this, we need to remove a screw, two ribbon connections which are encircled in the below image. Apply a gentle force from the right side to remove the chip(indicated by arrows in the image).
5. Now the phone will look as shown in the below image and with reference to it,
A - This is the EMMC Chip which needs a push to make a good contact with its board.
B - This is where the actual fix is gonna happen. Take a piece of cardboard which is around 1 or 2 mm thick(we can get the cardboard from packaging boxes) and cut it to a size just less than or equal to the size of the EMMC chip. Stick the cardboard here with a drop of glue and make sure that the glue does not spill.
C1 and C2 - These are ribbon connectors that connects to the board on which EMMC chip is located. So to counter the height gained by the EMMC Chip, place a small rectangle shaped cardboard underneath these pins C1 and C2. The cardboards need not be glued here.
 |
| Cardboard box |
6. Once the cardboards are in place then fit the chip-board(Indicated as D in the above image) back and make sure the cardboards does not move out of its place during this process. Give a gentle push on the board where those two ribbons C1 and C2 are located so that the ribbons gets connected to the board. You would hear a 'click' sound when C2 connects. Make sure to put the screw back near the SD card slot. This screw will make sure the cardboard underneath EMMC Chip does not move.
7. Put the plastic case back and fix the 16 screws. Insert the battery and turn on. Done!
Troubleshooting:
If the phone does not turn on or the screen doesn't work then,
1. Make sure the ribbons C1 and C2 are properly connected to the board
2. Make sure the cardboard under the EMMC chip is properly placed
3. Make sure the battery holds the charge. If not then connect the phone to a charger