Showing posts with label Flashing. Show all posts

Tuesday, August 24, 2021

How to flash a Custom ROM in Redmi 5A


Want to change your Redmi 5A (Riva) to a new phone? If yes then this article is for you. MIUI is good and has a good user interface but filled with a lot of bloatware. Over the course of time the phone starts to lag and becomes difficult for everyday use. Let's quickly get started with the process of flashing/installing PixelExperience ROM. Credit goes to the original developers.

Installation steps:

0. Your warranty will be void and data will be erased by flashing a custom ROM so take a compete backup of your phone. 

1. Enable developer options and navigate to 'Mi Unlock status'. To do this navigate to Setting -> 'About phone' and tap on the MIUI version several times to enable the Developer options'. 

Then, go to Settings -> Additional settings -> 'Developer options' and enable 'OEM unlocking'. Tap on the 'Mi Unlock status' and tap on 'Add acccount and device'. Turn on mobile data and turn off wifi to add your account and device. Await for the confirmation message. Following is the video for reference.


Enabling 'Developer options' and requesting for Mi unlock


2. Setting up ADB. You will need a computer for this. 

  • Download ADB files from here for Windows
  • Extract the contents of this ZIP file into a folder
  • Open the extracted folder then open up a Command Prompt from the same folder. To do this type 'cmd' on the address bar of the that folder and hit enter

  • Connect your phone to your computer with a USB cable. Change the USB mode to “file transfer (MTP)” mode if the phone is not deteced by the computer
  • In the opened Command Prompt window, enter the following command to launch the ADB daemon: adb devices
  • On your phone’s screen, you should see a prompt to allow or deny USB Debugging access. Ggrant USB Debugging access when prompted (and tap the always allow check box if you never want to see that prompt again).
  • Type the command 'adb devices' again to see if the phone is getting listed. Refer the following image


3. Download miflash unlock tool from here and sign in with your mi account. 

4. Download Lazyflasher file here which is to disable the dm-verity and forced encryption.

5. Download the 'Downgrade (O To N)Firmware' file from here.

6. Download the Pixel ROM from here. Download the 10(Plus edition) as shown in the below image.


7. Download the OrangeFox Oreo recovery from here. Extract the zip file and copy the file 'recovery.img' and paste into the adb folder.

Copy the recovery.img file


Pasted the file in the adb folder


8. Turn off your phone and boot into fastboot by holding Power + Volume down keys and once the fastboot screen is visible plug the phone to your computer with a good USB cable. 

Open the miflash unlock tool by double clicking on 'batch_unlock.exe' file. The phone will be visible on the tool with status 'Locked'. Click on 'Unlock(F6)' button. The phone will automatically restart. Now you have unlocked your phone for custom ROM flashing. 


9.  Turn off the phone and boot into fastboot by holding Power + Volume down keys and once the fastboot screen is visible plug the phone to your computer. Open adb folder and open a Command Promt by typing 'cmd' on the address bar of the that folder and hit enter. 

Type 'fastboot devices'  and see whether the phone is detected. Then type 'fastboot flash recovery recovery.img' and wait until it finishes successfully as shown in the below image.


10. Turn off your phone and boot into recovery by holding Power + Volume up keys. Connect the phone to the computer and move the files such as Lazyflasher, Downgrade (O To N)Firmware, Pixel ROM into the SD card and internal memory(optional but just for safety) as well. 

11. Install the Lazyflasher file 'lazyflasher-no-verity-opt-encrypt.zip' and wipe cache.


12. Install the 'Downgrade (O To N)Firmware.zip file' and wipe cache.


13. Reboot to recovery again by navigating to Menu -> Reboot -> Recovery. Now you will be booted to the new recovery 'PitchBlack Recovery Project'.


14. Go to Wipe -> Advanced Wipe and wipe the System, Vendor, Data, Cache, and Dalvik. 

If you are getting any failed message like 'Failed to decrypt data. Unable to decrypt with default password. You may need to perform a Format Data', then comeback to home and go to Wipe -> Swipe to Factory Reset.

Once done go to Wipe -> Advanced Wipe and wipe the System, Vendor, Data, Cache, and Dalvik. 

15. Go to home and tap on 'Install'. Select the Pixel ROM file from SD card. If you don't have SD card then copy the ROM file to internal memory by connecting the phone to computer. Once done then wipe cache and reboot to system.


16. Done!


Please feel free to comment if you had any queries. 


Friday, January 17, 2020

The Best Stable Custom ROM for Samsung Galaxy S7 / S7 Edge


About Galaxy S7 / S7 Edge:
It's been around four years now (2020) since Galaxy S7 / S7 Edge released but it can still compete with the current generation new phones. The hardware is almost equal to the phones that are coming out in 2020. The Camera quality is still one of the best among the latest phones. 4 GB RAM, Power-efficient Exynos / Snapdragon quad-core / octa-core processor, 12 MP camera capable of shooting 4K videos, Fingerprint sensor, Heart rate monitor, Water-resistant and many more. 

Official firmware update:
Usually, the phone manufacturers provide firmware support for 2 years from the launch of the phone but S7 / S7 Edge has got support even in December 2019. Yes, the latest firmware released for S7 / S7 Edge is in December 2019 but it is still on Android 8.0 Oreo. It is very unlikely that S7 / S7 Edge will get further major Android 9 or 10 updates. 

Custom ROMs:
Custom ROMs are firmware that is developed by many good-hearted Android developers out there. There are plenty of Custom ROMs for S7 / S7 Edge on the Internet and depending on the requirements one can choose the AOSP(pure Android) or Touchwiz(Samsung) ROMs. 
An important thing to note is that flashing a custom ROM will void the warranty. If you had purchased the phone a year ago then feel free to try out these ROMs at your own risk. Being cautious while trying out the steps to flash will reduce the risk. 


Now lets come to the point. Out of all the ROMs that I have tried, the best stable custom ROM for the S7 / S7 Edge is the BlackDiamond N8 Port. 


It is based on Samsung Touchwiz ported from Galaxy Note 8 with Android PIE 9.0.0 and Samsung ONE UI developed by KiLL-SwitCH
I have been using this ROM (V2.0) for around five months and it is butter smooth without any lags or restarts, highly stable, works flawlessly even when the internal storage is 100% full, excellent RAM management, runs high end games and apps flawlessly, supports VoLTE.
There is a latest version V5.1 available but I haven't updated to it since the version V2.0 itself is very stable. Recommeded to use as a daily driver and never leaves you disappointed. 


Installation Steps:

Compatible devices are G935X/G930X

1. Prerequisite of TKKG, AJ's latest official TWRP recovery or any TWRP recovery based on them.
2. Boot into Recovery by pressing and holding Volume UP + Power + Home buttons together and as soon as you see Galaxy S7 Boot logo, release all three buttons.
3. Wipe System/Data/Cache/Dalvik.Wiping internal storage would be even better.
4. Choose the downloaded ROM zip file and flash it. Choose Clean wipe too in Aroma. Choose your options in the Aroma installer.
5. Reboot.
6. Give sometime for the ROM to boot. First boot may take 5 to 10 minutes.

Download TKKG TWRP for S7 and S7 Edge
S7 img flashable: https://mega.nz/#!xEdWwYQZ!IdTYbSyUz...bwP3P-mkcJCelo
S7 odin flashable: https://mega.nz/#!tMVCBYrB!Bcvd2tGuv...5qe_zCOSLX_-rA
S7e img flashable: https://mega.nz/#!oFd2RIpa!M2JYNFiur...-yMXx8eMHhBZ7I
S7e odin flashable: https://mega.nz/#!4JcmXKpK!BANHL1q1Z...4EFn84C413BJuY

Download BlackDiamond N8 ROM
V2.0
V5.1 - Mega
V5.1 - GDrive


Camera Mod - Samsung 4K60 Camera Mod

Stock camera works perfectly fine but there is camera mod out there which outperforms most of the latest high end devices. This mod will allow to shoot video at 4K UHD at 60 fps, the PRO mode is tweaked to have the maximum shutter speed of 1/24000 of a second and ISO at 6400 max.  

Get the Camera 4K60 Camera Mod here


Saturday, January 5, 2019

Install Magisk (The System-less Root) in Galaxy S7/S7 Edge Exynos


Note: Take a complete backup of your data. There may be a chance to erase internal memory if required. This will void warranty. I am not responsible to any harm done to your device. You should know what you are doing. Follow the steps carefully. 

Get the TWRP for Galaxy S7 (Exynos) here
Get the TWRP for Galaxy S7 Edge (Exynos) here
Get latest Magisk zip here
Get latest Odin here
Get Encryption Disabler here

1) Go to Settings and enable the Developer Options (Keep tapping on the ‘Build number’ and you will find the Developer Options visible under Settings). Now enable “USB Debugging” and "OEM unlocking" if available

2) Transfer the Magisk zip file, TWRP tar file and the Encryption Disabler zip file into the SD card

3) Shut down your phone and hold Power button + Home button + Volume down simultaneously until you see some text on the screen. Now press “Volume up” button to enter the phone into Download Mode

4) Connect the phone into the PC USB port directly via USB cable. Avoid USB hubs

5) Open Odin and load the TWRP tar file (****.img.tar) in the AP section. Disable 'Auto Reboot'. Hit 'Start' button 

6) Once you see ‘Done’ or ‘Success’ in Odin, hold the Power + Home + Volume down buttons and once it leaves the Download Mode, change from volume down to volume up while holding other buttons

7) Press/Select "keep system read only" in order to Keep the Safety Net

8) In case you can’t read the internal storage of the phone (check that by pressing on install and checking internal storage), go to format-->format data and type yes. It explains there that, by doing so, you will remove encryption. This will erase the internal memory data.

9) Now tap on ‘Install’ and flash the Encryption Disabler zip file and then the Magisk zip file.

10) Clear Cache/Dalvik if requested and Reboot. Done!!!

Monday, November 19, 2018

How to flash boot image file using ODIN

How to flash boot image file using ODIN

1. Get the stock boot image file for your device. To get the stock boot.img file download the latest firmware from sammobile or updato. Extract the file and you will get the files as shown in the below image.


2. The boot image file is contained in the file starting with AP_G935F........... So extract this file and you get boot.img as one of the files. Recent firmware files from Samsung uses a new compression method known as lz4 so if you end up some thing like boot.img.lz4 then you need to extract the lz4 file using 7zip. Now finally you will have boot.img. 

3. ODIN needs files in .tar format. So use 7zip and archive/compress to .tar format. You can even rename the file as boot.img.tar as shown in the below screenshot


4. Open ODIN and plug your phone to your computer via USB cable. Your phone should be detected by ODIN. Click the AP button and select the boot.img.tar file from your computer. Hit 'Start'. The flashing will be done in seconds as shown in the below screenshot.


Sunday, November 18, 2018

Systemless Root for Samsung Galaxy phones using Magisk

Systemless Root for Samsung Galaxy phones using Magisk


Brief Intro about Magisk:
Magic Mask is know as Magisk. “Systemless” root can be achieved by Magisk. It is a way to modify the system without actually modifying it. Modifications are done in a duplicate boot partition instead of modifying the real system files. Modifications are undetected by SafetyNet since the original files remains unchanged. This is an alternate for SuperSU. 

Let's get started 👍

Prerequisites:

  • Read this post at least twice before starting. You agree that you are performing this at your own risk.Warranty may be void. 
  • Take a full backup of your phone. Need to do a factory reset during the process.
  • Stock boot image file of your device
  • Magisk Manager
  • ODIN

This method is applicable for all Android phones and I am taking Samsung Galaxy S7 Edge as an example to show the demo. There are many ways available to root a phone but the way we are gonna achieve root does not require custom recovery. In other words, flashing Masigk without root and does not require a custom recovery. 

1. Get the stock boot image file for your device. I am taking Galaxy S7 Edge as an example here. Download the latest firmware from sammobile or updato. Extract the file and you will get some files as shown in the below image.


2. The boot image file is contained in the file starting with AP_G935F........... So extract this file and you get boot.img as one of the files. Recent firmware files from Samsung uses a new compression method known as lz4 so if you end up some thing like boot.img.lz4 then you need to extract the lz4 file using 7zip (get 7zip from here). Now finally you will have boot.img. 

Get the Stock boot image file for Samsung Galaxy S7 edge here or here

3. Now download the Magisk Manager. Get it here and install it in your device. 

4. Move the extracted boot.img file to your SD card

5. Open Magisk Manager and go to Settings -> Update Settings -> Patched Boot Output Format, and select .img.tar

6. Go to the homepage of the Magisk and select Install -> INSTALL -> Patch Boot Image File -> Select your stock boot image file(boot.img) from the SD card

7. Magisk Manager will now patch the boot image and stores in Internal Storage/Download/patched_boot.img.tar

8. Copy this patched_boot.img.tar file to your desktop

9. Download the latest ODIN from here

10. Put the phone in Download mode(For S7 Edge -> Press Home key + Power button + Volume down simultaneously and continue to Download mode) Connect the phone to the PC via USB cable and open ODIN

11. Your phone should be detected by ODIN. Click the AP button and select the patched_boot.img.tar file from your desktop. Hit 'Start'. The flashing will be done in seconds. Below image is for reference.


12. Your phone will now reboot and asks you to to do a reset. After Resetting, you are Done. 

13. Go to the app drawer and you can find the Magisk Manager. Open it and follow the on screen instructions which requests you to Install Magisk. 

14. Now your phone is rooted systemless-ly. You will still be eligible to receive official OTA updates. 

Note: You may receive a warning message by 'Device Security' as shown in the below screenshot. Do not restart phone from here. Ignore it. 


Saturday, May 26, 2018

Installing Official Oreo 8.0 in Samsung Galaxy S7/S7 Edge

Samsung is delaying the release of Oreo 8.0 for Galaxy S7 and S7 Edge phones but some countries had tasted the flavor of Oreo 8.0.
So we are gonna try the Oreo 8.0 in our phones by flashing other countries' firmware. 
This is completely official ROM from Samsung and the features such as Samsung Pay, Knox, etc. works.

Make sure to follow the below steps carefully.

1. Backup all your data since it completely wipes out the data in the phone. Make sure the phone is charged over 60%

2. The models ending with D such as G930FD or G935FD are Indian variants which does not have Oreo yet. Go to the site https://www.sammobile.com/firmwares/ and search for your variant, say SM-G930F for S7 and SM-935F for S7 Edge. 

3. Select a country's firmware which has Oreo 8.0 (Say United Kingdom) and download the firmware file.

4. Download the latest ODIN from http://odindownload.com/

5. Extract or Unzip the firmware file into a folder. Avoid using winrar as it can cause errors. Use 7zip instead. The extracted files are shown in the below screenshot.


6. Run/Open ODIN as Administrator

7. Put the phone in download mode. Shutdown your phone. Press Power + Home + Volume down. A screen appears asking you whether to continue or not. Press Volume up to continue. Connect the phone to the computer via a good USB cable. The ODIN should show the it has detected your phone.

8. From the extracted firmware put the below files in ODIN. Click on the buttons BL, AP, CP,  CSC one by one and choose the respective files. The file to be chosen for BL will start with file name BL. The file to go for AP will start with the file name AP and so on as shown in the following image. 
Note: Select CSC instead of Home CSC

      BL
      AP
      CP
      CSC


9. Check the below options. (for this select Options tab).

F.reset time
Auto reboot

10. Check the below option as shown in the following image.

Re-partition


11.   Now click the Start button and wait until the ODIN shows PASS. The phone will now reboot.

12.   To receive OTA updates, after installing the firmware, put the phone into Recovery Mode and wipe cache then wipe data/factory reset.

To go to the recovery mode press Power + Home + Volume up button. Now select ‘Cache Partition’ and wipe it. Then ‘wipe data/factory reset’ and reboot your phone. 
You are done.


Tuesday, January 23, 2018

One Click Root for Android devices running 7.0/7.1 Nougat


Root your phone On The Go!!
This is the simplest way ever to root your latest android devices running 7.0/7.1 Nougat. Rooting this way doesn't require a PC and can be carried out even by a newbie. 

Note: Rooting may void your device warranty. 

Steps:
1. Download the Kingroot apk here
2. If there are some warnings about the file as shown in the below image, click 'OK' to proceed


3. Now go to Settings > Security > Unknown sources > Check the box and allow


4. Go to Settings > Security > Verify apps > Uncheck it
5. Install the downloaded apk in your android device
6. Open the app and it looks like the below image. 


7. Tap the icon of Kingroot and tap on 'One Click Root'. Note that a stable internet connection is required while you perform this action. 
8. You will get the result success or fail. Try it few more times if you saw Fail message since the app runs one script at a time. Running it few more times increases the chances of root. 


Put down your comments whether you had succeeded with root on your device or faced any other issues. 


Tuesday, April 18, 2017

Flashing Indian firmware on Samsung devices for Reliance Jio to work

This guide is only applicable for 4G Samsung phones purchased outside India.

Those who have bought their phones overseas are now struggling to use Reliance Jio because they do not support VoLTE. And this guide will help you in making the Samsung phone to support VoLTE and Samsung Pay as well.

Before trying out this guide please make sure you have a 4G Samsung phone.

Let’s get started. 👍

1.       Ensure the phone is charged over 60%. This process will wipe your entire data on the phone.

2.       Check the model number of your Samsung phone.

Settings --> About --> Model Number

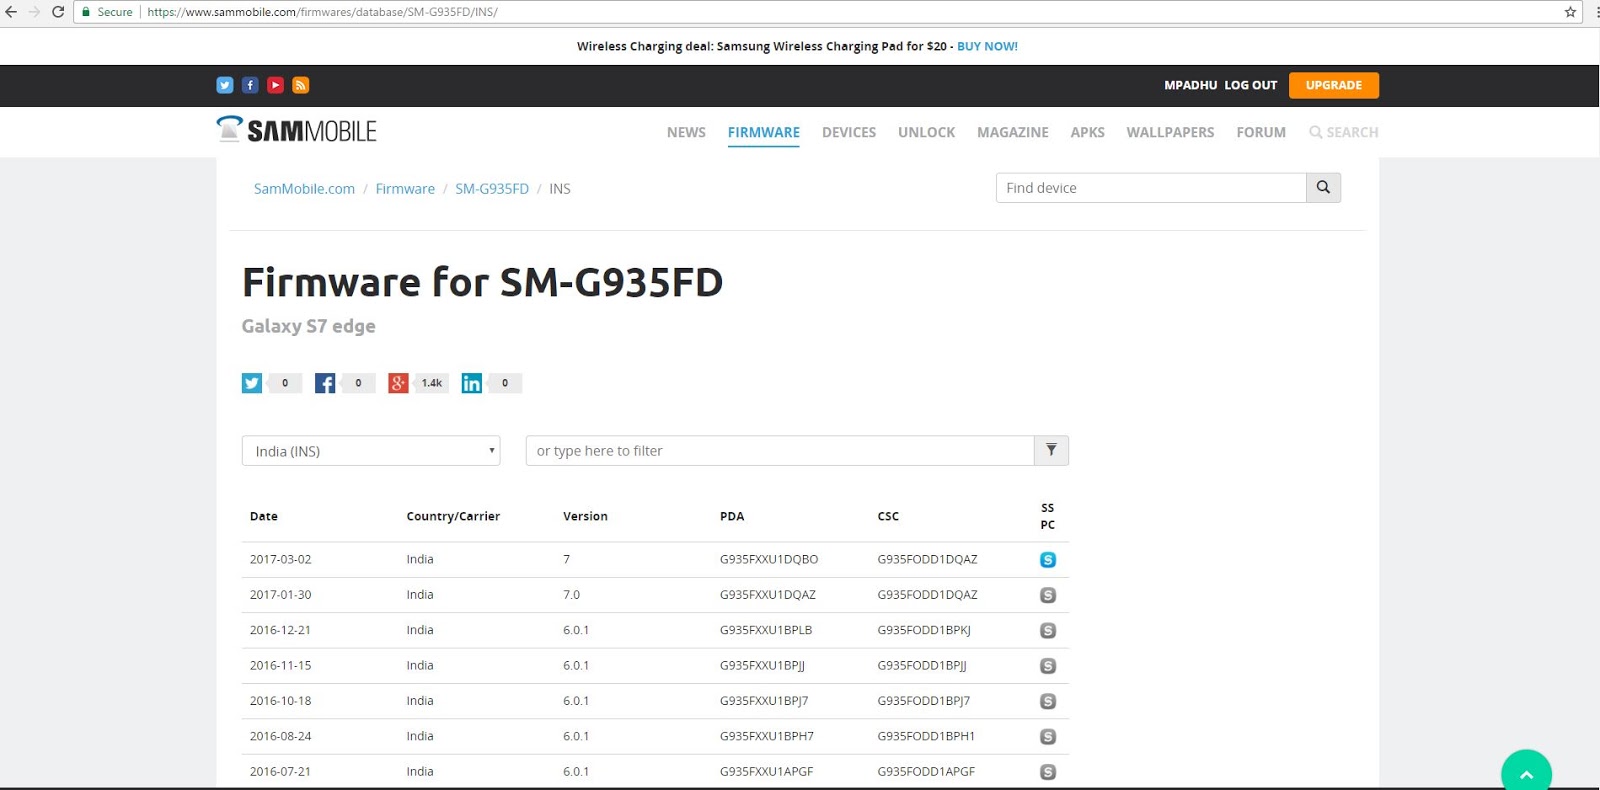
3.       Go to the site https://www.sammobile.com/firmwares/ and insert your model number in the search bar and it will show all the available firmware versions for your model along with the country names. Check for INS or INU which indicates the Indian firmware. Download the latest Indian firmware for your model.


Below is the search result for the Samsung Galaxy S7 Edge (SM-G935FD) filtered by the Country India (INS). Click on the latest version and download the file.


4.       Download the latest ODIN from http://odindownload.com/ or Here

5.       Extract or Unzip the firmware file into a folder. Avoid using winrar as it can cause errors. Use 7zip instead.

6.       Run/Open ODIN as Administrator

7.       Put the phone in download mode. Shutdown your phone. Press Power + Home + Volume down. A screen appears asking you whether to continue or not. Press Volume up to continue. Connect the phone to the computer via a good USB cable. The ODIN should show the it has detected your phone.

8.       From the extracted firmware put the below files in ODIN. Click on the buttons BL, AP, CP,  CSC one by one and choose the respective files. The file to be chosen for BL will start with file name BL. The file to go for AP will start with the file name AP and so on as shown in the following image.

      BL
      AP
      CP
      CSC


9.       Check the below options. (for this select Options tab).

F.reset time
Auto reboot

10.   Here we are installing Indian country firmware from other country’s firmware so we need to change the System partition size. To do this select PIT file and the check the below checkbox. Note: PIT file is not required nowadays as it is already built-in the CSC file. So just check the below option as shown in the following image.

Re-partition


Note: If you are installing a multi CSC firmware, and your existing CSC is in that firmware, then DO NOT select Re-partition.

You can check if your firmware is Multi-CSC by installing this app (Phone Info). Link given below:

https://play.google.com/store/apps/details?id=org.vndnguyen.phoneinfo&hl=en

11.   Now click the Start button and wait until the ODIN shows PASS. The phone will now reboot.

12.   To receive OTA updates, after installing the firmware, put the phone into Recovery Mode and wipe cache then wipe data/factory reset.

To go to the recovery mode press Power + Home + Volume up button. Now select ‘Cache Partition’ and wipe it. Then ‘wipe data/factory reset’ and reboot your phone.

You are done.✌ Post your comments below if you had flashed successfully or if you faced any issue or want anymore help. Let me know if you are stuck somewhere, I can provide you live support.


Important Posts

How to root the phone ?
Check here if you wanna root your android device Systemless-ly using Magisk


Stable custom ROM for S7 / S7 Edge with VoLTE
Check here if you wanna flash your phone with a stable Custom ROM that supports VoLTE