Showing posts with label Fixes for issues in Android. Show all posts

Wednesday, February 26, 2020

100% Fix for 'mmc_read failed' error in Samsung Galaxy Note 4 and other devices

Some of the old devices might have started to get an error 'mmc_read failed' and fails to boot randomly. As the time goes by, this issue becomes more prominent and makes the device completely useless.

The error looks as follows:
Could not do normal boot.
ddi : mmc_read failed
ODIN MODE (HIGH SPEED)
PRODUCT NAME: SM-N9100
CURRENT BINARY: Samsung Official
SYSTEM STATUS: Custom
REACTIVATION LOCK: Off
KNOX WARRANTY VOID: 0x1 (0)
QUALCOM SECUREBOOT: ENABLE (CSB)
RP SWREV: S1, T1, R1, A1, P1
SECURE DOWNLOAD : ENABLE
UDC START

'mmc_read failed' error in Download mode

Note: The PRODUCT NAME and RP SWREV changes based on the different Galaxy Note 4 models or other phone models

The symptoms of a mmc read fail are:
  • Phone goes directly to download mode by switching it on
  • Displays the error message 'ddi : mmc_read failed' in the Download mode
  • Randomly boots to the Android
  • Doesn't boot into recovery(Stock or Custom like TWRP)
  • No indication of charging while plugged to a charger when phone is switched off
  • Heavy battery drain in some cases
  • Restarts often
  • Phone doesn't boot even after pressing the power button. Need to remove the battery for some good 15 to 20 minutes and then insert it and switch on to at least boot into download mode
  • Flashing stock or custom ROMs in the download mode via ODIN always fails
  • Gets 'No PIT Partition found' error while flashing things like recovery, boot img, etc via ODIN
  • As it gets worse, the phone stops booting completely and becomes useless but can be used as a paper weight

Fix:
Warning: This fix works for most devices when done by exactly following the steps with patience and concentration. Do at your own risk.

This fix is not related to the software but to the hardware itself. Don't get scared as it is just a small fix but needs patience and concentration to make it done!.
The mmc_read fail error arises due to few reasons but more than 90% of the cause would be that the processor cannot read the emmc chip due to poor contacts. So we gonna fix this issue by forcing the chip to make a tight contact with its terminals so that the processor can read data from the chip.


Lets get started 👍

1. Remove the battery and the back case.

2. There are totally 16 screws and remove all of them and store them carefully somewhere. There would be a screw which usually hidden under a sticker as pointed in the below image. Make sure to unscrew it as well.


3. Push the screen gently and slowly from the battery compartment of the phone as shown in the below image. The screen would pop out on the other side. Use a credit card to cut all the adhesive strings. Repeat this with patience and concentration all over the battery compartment to remove the screen completely. A razor blade may also be used to cut the adhesive strings that are strong.

Do not insert the credit card or blade between the screen and the electronic chip board sticking to it as it may break down the electronic connections.


4. Once the screen is removed off from the back case, the interior of the phone looks like as shown in the below image. In this, we need to remove a screw, two ribbon connections which are encircled in the below image. Apply a gentle force from the right side to remove the chip(indicated by arrows in the image).


5. Now the phone will look as shown in the below image and with reference to it,
A - This is the EMMC Chip which needs a push to make a good contact with its board.
B - This is where the actual fix is gonna happen. Take a piece of cardboard which is around 1 or 2 mm thick(we can get the cardboard from packaging boxes) and cut it to a size just less than or equal to the size of the EMMC chip. Stick the cardboard here with a drop of glue and make sure that the glue does not spill.
C1 and C2 - These are ribbon connectors that connects to the board on which EMMC chip is located. So to counter the height gained by the EMMC Chip, place a small rectangle shaped cardboard underneath these pins C1 and C2. The cardboards need not be glued here.

Cardboard box


6. Once the cardboards are in place then fit the chip-board(Indicated as D in the above image) back and make sure the cardboards does not move out of its place during this process. Give a gentle push on the board where those two ribbons C1 and C2 are located so that the ribbons gets connected to the board. You would hear a 'click' sound when C2 connects. Make sure to put the screw back near the SD card slot. This screw will make sure the cardboard underneath EMMC Chip does not move. 

7. Put the plastic case back and fix the 16 screws. Insert the battery and turn on. Done!

Troubleshooting:
If the phone does not turn on or the screen doesn't work then,
1. Make sure the ribbons C1 and C2 are properly connected to the board
2. Make sure the cardboard under the EMMC chip is properly placed
3. Make sure the battery holds the charge. If not then connect the phone to a charger


Monday, November 19, 2018

How to flash boot image file using ODIN

How to flash boot image file using ODIN

1. Get the stock boot image file for your device. To get the stock boot.img file download the latest firmware from sammobile or updato. Extract the file and you will get the files as shown in the below image.


2. The boot image file is contained in the file starting with AP_G935F........... So extract this file and you get boot.img as one of the files. Recent firmware files from Samsung uses a new compression method known as lz4 so if you end up some thing like boot.img.lz4 then you need to extract the lz4 file using 7zip. Now finally you will have boot.img. 

3. ODIN needs files in .tar format. So use 7zip and archive/compress to .tar format. You can even rename the file as boot.img.tar as shown in the below screenshot


4. Open ODIN and plug your phone to your computer via USB cable. Your phone should be detected by ODIN. Click the AP button and select the boot.img.tar file from your computer. Hit 'Start'. The flashing will be done in seconds as shown in the below screenshot.


Sunday, December 31, 2017

Change between CSCs in a multi CSC firmware


There are firmware which contains multi CSCs in it. So If you wanna change to any other countries' firmware then use this method to check if your current firmware contains the one which you need.

For instance, EUR firmware contains the CSCs BTU, CPW, DBT, etc. 
INS firmware contains the CSCs BNG, NPL, SLI, etc. 

Follow the below steps to change between the CSCs:
NOTE: Back up your data. It resets your phone.

1. Launch your phone dialer and type *#272*Phone’s IMEI Here#
2. Your phone will automatically pop up a screen with some codes. 
3. They are the CSC codes
4. Select the one which you need
5. Now your phone will factory reset and restarts
6. Done. Your phone's CSC has been changed successfully. 

Multi CSCs in INS firmware

Wednesday, April 19, 2017

Reliance Jio Supported Model List

Reliance Jio Supported Model List

NOTE:
You need India INS/INU firmware for these to work on Reliance Jio

Samsung A8 VE (SM-A800I)
Samsung Galaxy A5 (SM-A500G)
Samsung Galaxy A5 (2016) (A510FD and A510F with INS A510FD firmware)
Samsung Galaxy A7 (SM-A700FD)
Samsung Galaxy A7 (2016) (A710FD)
Samsung Galaxy A8 (SM-A800F)
Samsung Galaxy Core Prime 4G (SM-G360FY)
Samsung Galaxy J2 (2016) (SM-J210F)
Samsung Galaxy J3 (2016)
Samsung Galaxy J5 (SM-J500F)
Samsung Galaxy J7 (SM-J700F)
Samsung Galaxy Note 4 (SM-N910G)
Samsung Galaxy Note 4 Edge (SM-N915G)
Samsung Galaxy Note 5 (SM-N920G)
(Samsung Galaxy Note 7) may be subject to review
Samsung Galaxy S6 (SM-G920I)
Samsung Galaxy S6 Edge (SM-G925I)
Samsung Galaxy S6 Edge Plus (SM-G928G)
Samsung Galaxy-J2 (SM-J200G)
Samsung J Max
Samsung J5 (2016) (SM-J510FN)
Samsung J7 (2016) (SM-J710FN)
Samsung te 5 Duos (SM-N9208)
Samsung ON5 (SM-G550FY)
Samsung ON5 Pro(SM-G550FY)
Samsung ON7 (Mega On – SM-G600FY)
Samsung ON7 Pro(SM-G600FY)
Samsung S7 (SM-G930F)
Samsung S7 Edge (SM-G935F)
Samsung Galaxy J2 Pro
Samsung Z2

NOTE:
If you manage to get Reliance Jio VoLTE on another Samsung model without the MyJio app, then please post the details in the comment section below.


Tuesday, April 18, 2017

Flashing Indian firmware on Samsung devices for Reliance Jio to work

This guide is only applicable for 4G Samsung phones purchased outside India.

Those who have bought their phones overseas are now struggling to use Reliance Jio because they do not support VoLTE. And this guide will help you in making the Samsung phone to support VoLTE and Samsung Pay as well.

Before trying out this guide please make sure you have a 4G Samsung phone.

Let’s get started. 👍

1.       Ensure the phone is charged over 60%. This process will wipe your entire data on the phone.

2.       Check the model number of your Samsung phone.

Settings --> About --> Model Number

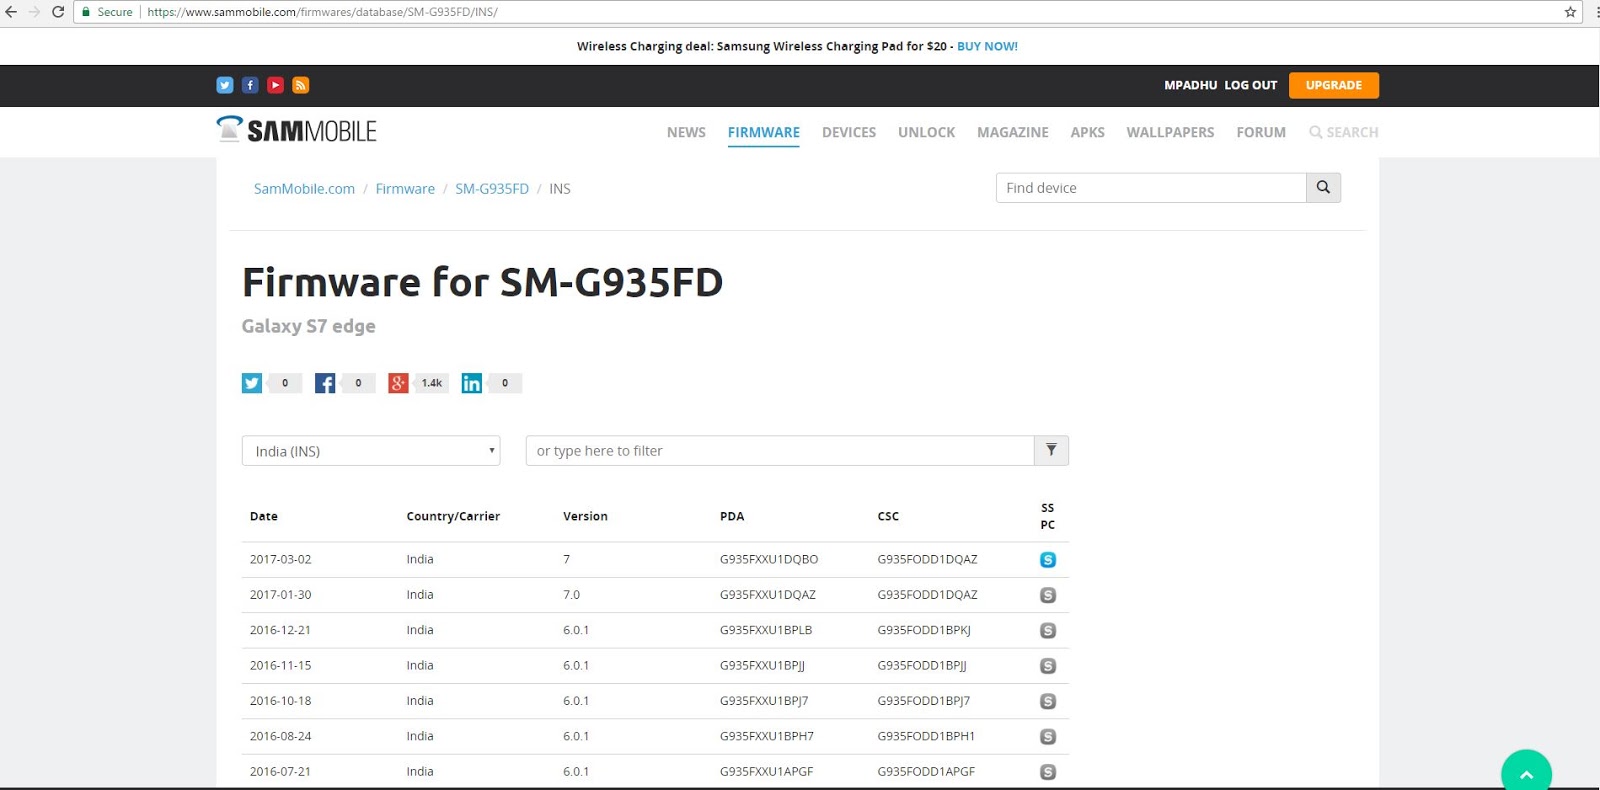
3.       Go to the site https://www.sammobile.com/firmwares/ and insert your model number in the search bar and it will show all the available firmware versions for your model along with the country names. Check for INS or INU which indicates the Indian firmware. Download the latest Indian firmware for your model.


Below is the search result for the Samsung Galaxy S7 Edge (SM-G935FD) filtered by the Country India (INS). Click on the latest version and download the file.


4.       Download the latest ODIN from http://odindownload.com/ or Here

5.       Extract or Unzip the firmware file into a folder. Avoid using winrar as it can cause errors. Use 7zip instead.

6.       Run/Open ODIN as Administrator

7.       Put the phone in download mode. Shutdown your phone. Press Power + Home + Volume down. A screen appears asking you whether to continue or not. Press Volume up to continue. Connect the phone to the computer via a good USB cable. The ODIN should show the it has detected your phone.

8.       From the extracted firmware put the below files in ODIN. Click on the buttons BL, AP, CP,  CSC one by one and choose the respective files. The file to be chosen for BL will start with file name BL. The file to go for AP will start with the file name AP and so on as shown in the following image.

      BL
      AP
      CP
      CSC


9.       Check the below options. (for this select Options tab).

F.reset time
Auto reboot

10.   Here we are installing Indian country firmware from other country’s firmware so we need to change the System partition size. To do this select PIT file and the check the below checkbox. Note: PIT file is not required nowadays as it is already built-in the CSC file. So just check the below option as shown in the following image.

Re-partition


Note: If you are installing a multi CSC firmware, and your existing CSC is in that firmware, then DO NOT select Re-partition.

You can check if your firmware is Multi-CSC by installing this app (Phone Info). Link given below:

https://play.google.com/store/apps/details?id=org.vndnguyen.phoneinfo&hl=en

11.   Now click the Start button and wait until the ODIN shows PASS. The phone will now reboot.

12.   To receive OTA updates, after installing the firmware, put the phone into Recovery Mode and wipe cache then wipe data/factory reset.

To go to the recovery mode press Power + Home + Volume up button. Now select ‘Cache Partition’ and wipe it. Then ‘wipe data/factory reset’ and reboot your phone.

You are done.✌ Post your comments below if you had flashed successfully or if you faced any issue or want anymore help. Let me know if you are stuck somewhere, I can provide you live support.


Important Posts

How to root the phone ?
Check here if you wanna root your android device Systemless-ly using Magisk


Stable custom ROM for S7 / S7 Edge with VoLTE
Check here if you wanna flash your phone with a stable Custom ROM that supports VoLTE


Monday, April 10, 2017

Battery saving tips and tricks

Latest modern smartphones are more power hunger devices with big HD, Full HD and even 4K displays. These smartphones are incorporated with huge capacity batteries reaching to a whopping 6000mAh or higher in some devices.
So we definitely need to follow some techniques to save the juice and make the devices run a bit longer.
 
1. Turning off or Disabling the default apps. Almost all phone manufacturers load the phones with bloatware which occupies lots of space and slows down the device by running silently in the background.
To do this go to the App info of the App which you need to disable. Click Disable. You're done. The app will be disabled and will not be visible in the App drawer. Before disabling, it is good to clear cache and data. This will help in freeing up some space.
 
2. From Android 6(Marshmallow) onwards, there is an option to change the screen resolution. For example, A QHD display would have resolutions HD, Full HD and WQHD to choose from. Reducing the screen's resolution will reduce the battery consumption. WQHD resolution will consume more power than HD resolution.

1280×720 -> HD / 720p
1920×1080 -> FHD (Full HD) / 1080p
2560×1440 -> QHD/WQHD (Quad HD) / 1440p
3840×2160 -> UHD (Ultra HD) / 4K 2160p
7680×4320 -> FUHD (Full Ultra HD) / 8K 4320p


3. Turn off unused apps. Yes, Android allows you to turn off unused apps and by doing this, the app will be removed from the phone's RAM thus saving CPU usage which in turn leads to power saving.
There are apps from play store which can do this job for you. Greenify is one among the popular apps for hibernating apps and saving battery power. Select the apps that needs to be hibernated so whenever screen turns off the apps will also be turned off. Note that you will not receive notifications if you hibernated an app that gives notifications such as Whatsapp or Viber.

4. If your phone has an AMOLED screen (like most Samsung devices), use a dark-colored background. Black wallpaper can increase battery life because AMOLED screens only illuminate the colored pixels. Black pixels are unlit, so the more black pixels you have, or the more darker pixels, the less power is needed to light them up.

5. Clear the recent apps.Some myths have cropped up that it’s good practice to pull up the Recent Apps menu and swipe away any apps you aren’t using, effectively killing them but this is not true. It does not kill the app. Sometimes it’s possible for apps to go rogue and start hogging resources, but those are the kind of power hunger apps you want to put down for good.

6. Turn off Auto Sync. Turn off auto-syncing for Google accounts. If you don't need every single Google account updated every few minutes or so, just go into Settings and Google account and turn off auto-sync for those apps you don't need constantly updated.
Some apps like email will allow you to manually refresh when you launch them, rather than running multiple auto-syncs throughout the day when you may not need them to. Just sync the apps whenever you need them.

7. Turn off location and background data. Some apps needs location permissions and thus will always keep searching for location when the app is running in foreground or background. So turn on the location only when the app requires it and then turn it off once done.
Keep an eye on apps that use data in the background. Some apps such as the Email, Play Store, Onedrive, etc., continuously collect and send data in the background.
But, you can also perform a hard restriction in Settings -> Data Usage; tap the Menu button tick the “Restrict Background Data” option to enable it. You can also enable per-app restriction by opening each app’s info page.


8. It is always good to have a practice of charging the phone only till 80%. Charging over 80% will degrade battery's life. In the same way charge your phone once it discharges to 30% so the battery should be in between the 30% and 80% of the charge. This is called shallow charging.

There is an app which automatically stops charging once it reaches 80%. Try it out here.


Sunday, March 12, 2017

Switch between Google Now and Google Assistant

There is a way to switch to Google now if you are not Ok with the new Google Assistant. There are some simple steps which can be done to switch between the both.

1. Go to settings
2. Go to 'Language and input' and select language.
3. Now select default language as other than English(US) to get the Google now.
4. To revert back to Google Assistant, select the default language as English(US).

As simple as that. Wait for sometime for the changes to take place. This is a temporary technique which works for now since Google Assistant is not rolled out to all the regions.

Sunday, August 17, 2014

How to disable Cell Broadcast messages in Custom ROMs

Cell broadcast messages are the messages that your mobile service provider sends you based on your current geographic location as determined by the cell towers of the service provider. The mobile service provider sends you messages related to weather, location, local news, emergency alerts, advertisements, offers and so on. In the beginning the cell broadcast service was mostly useful, but these days the service providers are using it to advertise various things to the customers. If you have been receiving such messages on your Android smartphone, then you can disable the cell broadcast messages and get rid of these annoyances in just few clicks.There are few ways to disable the Cell Broadcast Messages. Let's see them now. 

1. Method 1 (Need Root access)
The easiest way to disable Cell Broadcast messages in Custom ROMs like ParanoidAndroid, SlimKAT, etc. is to delete an apk file related to Cell Broadcast.

To do this we need root access. Be cautious while deleting this file and you may brick your phone if you deleted some other system file so carry out this task on your own risk but deleting the correct file would help to stop Cell Broadcast messages in future.

Go to System/data and find for CellBroadcastReceiver.apk file and delete it. To be on safer side cut this file and paste in your external SD card. You can permanently delete this file if you were not encountering any other issues with Messages.

2. Method 2 (No Root required)

Go to Messages --> Settings
Select the settings for 'Text Messages'
Go to Cell Broadcast and turn it off


Sunday, June 8, 2014

How to solve "Insufficient Storage Available" issue while installing android apps

"Insufficient Storage Available" Error


This is sometimes a common problem in android phones while updating an existing app.
There is an easy way to resolve this problem and it works on most android phones. 
Please note that this works only on ROOTED android phones. This method won't work in phones without root access.

Below is an example with which the procedure is demonstrated.

The app which gives problem in this example is Clean Master. Whenever I update this app, it downloads the update but while installing it gives the error message "Insufficient storage available" or shows an error code as shown below.


Step 1: Download and install a File Browser which can access root files.
Step 2:  Go to /data/app-lib/ directory. There could be a lot of folders.
Step 3: Select the folder(s) related to the app which gives you problem. In this case, I have to search for the folder(s) containing the name Clean Master.
Step 4: There could be more than one folder displayed with the app name. In this case, there are two folders com.cleanmaster.mguard-1 and com.cleanmaster.mguard-2 as shown in the below picture. Delete these folders. (Take a backup of these folders for safer side. Later you can delete if not required).
Step 5: After deleting successfully, restart the phone. Now you can update your app.


Note: Be careful while accessing files in root. You may damage your phone if you don't know what you are doing.