Showing posts with label Tips and Tricks. Show all posts

Monday, July 21, 2025

Cloning Windows OS to another Disk (SSD, HDD) as a bootable drive

Cloning the Windows operating system has become quite simple thanks to the availability of various user-friendly tools. In this article, we'll walk through the process of cloning Windows OS using WD's Acronis TrueImage software. The SSDs used in this demonstration are a Samsung 860 EVO 250GB SATA M.2 SSD and a WD Blue 2TB SATA M.2 SSD.

A key component in this setup is a SATA M.2 SSD to 2.5-inch SATA adapter. This adapter is essential because SATA M.2 represents an older SSD interface, which has become less common with the rise of NVMe SSDs that use PCIe instead of SATA. The adapter not only makes the SATA M.2 SSD compatible with modern systems by converting it into a standard 2.5-inch form factor, but also ensures it can be used in most desktops and many laptops.

Get the adapter here: https://amzn.to/3TRPqwy


M.2 SATA & mSATA SSD to 2.5inch SATA3.0 Adapter Converter 


Need a USB to 2.5 inch SATA adapter wire to connect it to the computer via USB port. 

Get the USB 3.0 to SATA adapter: https://amzn.to/44Ew8Ro

USB 3.0 to SATA adapter


Step 1: Install the Acronis software (Get the download link from google). Open it. Select TOOLS and then click on 'Clone Disk'


Step 2: Select 'Automatic' clone mode


Step 3: Select the source disk (Samsung 860EVO 250GB, in this case)


Step 4: Select the destination disk to which the OS to be cloned (WD 2TB SSD, in this case)


Step 5: Verify the disks chosen


Step 6: Wait for few hours without disturbing and the clone will be completed successfully. 


Step 8: Once cloning is done, remove the old SSD from the computer and insert the new cloned SSD. Booth the computer and it should work as it was previously. 

Comment if you faced any issue or need any help


Saturday, May 2, 2020

Free Unlimited Cloud Backup for Photos and Videos


Most of the latest smartphones which we own now captures photos / videos at a very high resolution that can occupy more space. Even the videos shot at Full HD eats a lot of space on phone's memory or sd card. No need to say specific about 4K videos!.

So what is the app that gives unlimited free backup space?. Answer is Google Photos

This app gives an option to upload / sync unlimited photos and videos at high resolution. The app just syncs all the photos and videos from your phone to the google server and the synced photos and videos can be accessed from any device, anywhere, via any browser, anytime by hitting photos.google.com
Deleting the photos from the phone will not delete the copy from the google server. 

There are three quotas available as follows,

1. Original quality - Backs up media at Original resolution which counts against the 15 GB google storage space. It allows us to buy more storage if we had crossed the 15 GB limit

2. High quality - Unlimited free backup at High resolution. Photos are compressed to 16 MP, Videos are compressed to high definition

3. Express - Unlimited free backup at Reduced resolution. Photos are compressed to 3 MP, Videos are compressed to standard definition


Some of the useful features of the Google Photos app

1. Acts as a gallery
2. Frees up space
3. Creates smart albums automatically
4. Advanced photo editing
5. Sharing
6. Smart and powerful search
7. Allows to link many phones under same google account and so on...


Saturday, April 25, 2020

How to delete Whatsapp backup from Google Drive?

If you had provided your google account(gmail id) for the backup of WhatsApp messages then you have no option to remove the account from WhatsApp itself but you have to login to your google drive to delete the backup. Let's see how to do that!

Deleting the backup from Google Drive

1. Sign in to your google account from this link https://drive.google.com/
2. Go to Setting from the Settings icon


3. Click 'Manage Apps' from the menu on the left. Scroll till you find 'WhatsApp  Messenger' and click on 'Options' --> 'Disconnect from Drive'


Deleting the backup from Android phone

1. Open File Manager
2. Got to Internal Storage and find the folder 'WhatsApp' and delete it


Stopping WhatsApp to make any more backup in future

1. Open WhatsApp and tap on the three dots at the top right and select 'Settings'
2. Tap on 'Chats' --> 'Chat backup'
3. Tap on 'Back up to Google Drive' and select 'Never. This will stop WhatsApp from backing up the data even though you had provided a google account


Wednesday, April 8, 2020

How to disable auto download of media in Telegram ?


As soon as we login to the Telegram app, we can notice that the media gets auto downloaded as we browse through the chats/groups/channels. 

The auto download of media files can be controlled in the Settings. Here is how to do it.

1. Open Telegram and tap on the hamburger icon at the top left and tap on Settings


2. On the Settings, tap on the 'Data and Security'

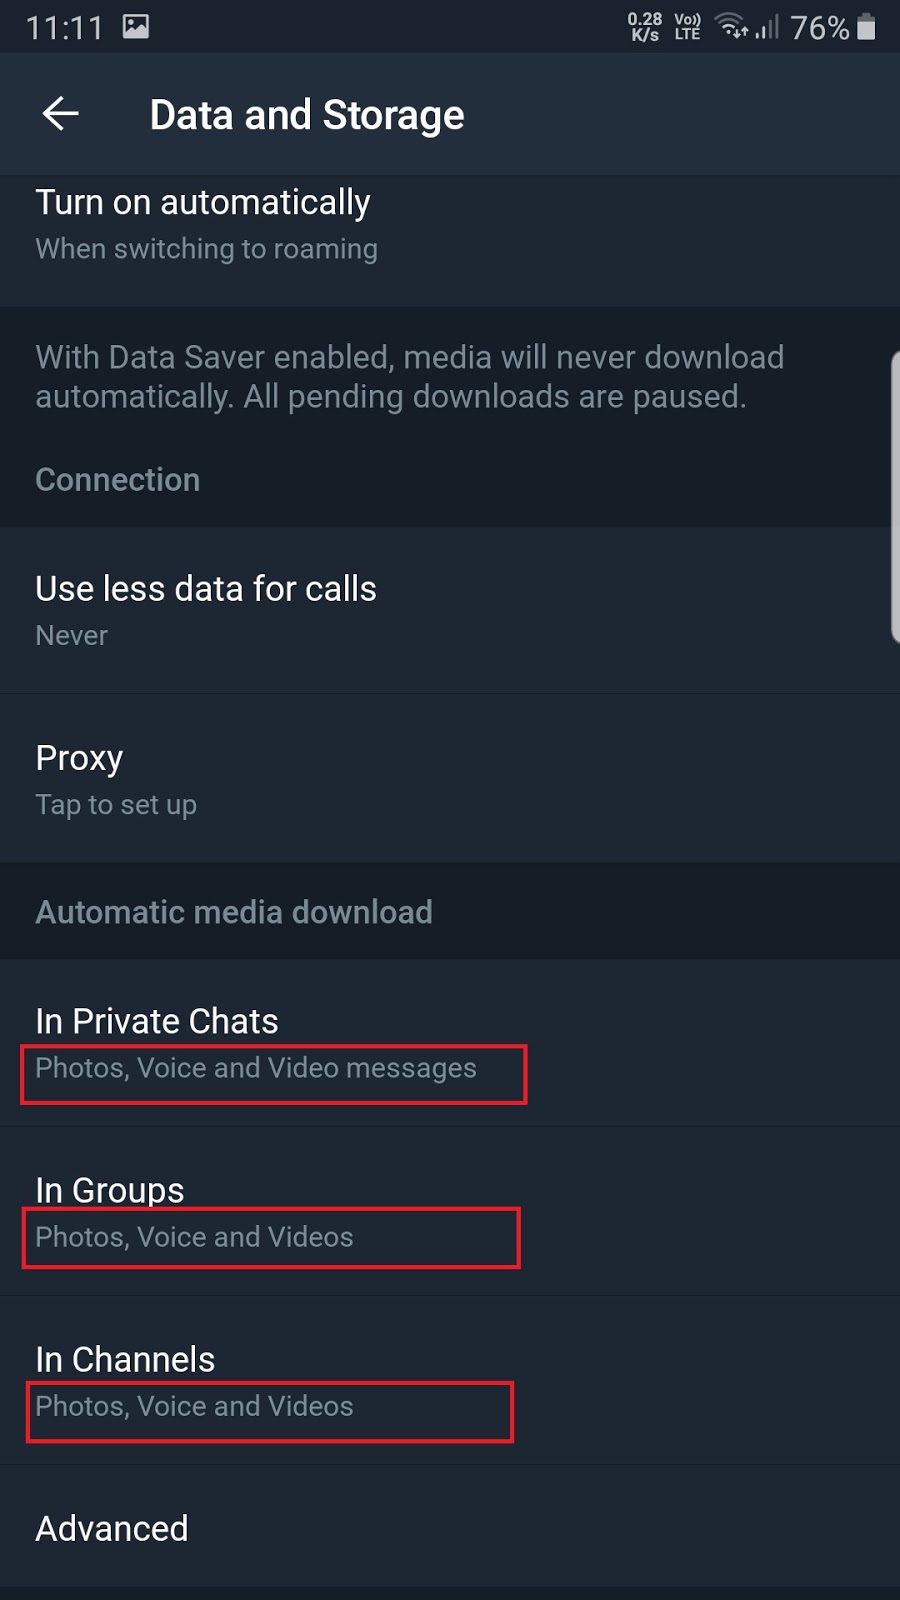
3. Scroll down to the section 'Automatic media download'. Here we can see the media that are set to be auto downloaded for Private Chats, Groups, Channels


4. Tap on it and deselect all the check boxes and tap on SAVE


5. Once all the check boxes are disabled for Private Chats, Groups and Channels then it should show 'Nothing' as shown in the below image. 

Done!. None of the media file gets downloaded automatically now but can be downloaded manually by tapping on the image/video/file/document


Friday, March 20, 2020

How to enable Dark Mode in WhatsApp ?

Enabling Dark Mode in WhatsApp is very simple as shown in the below steps.


1. Open WhatsApp and tap on the three dot menu on the top right

2. Tap on Settings

3. Tap on the Chats
 
4. Tap on the Theme

5. Now a popup would be displayed to select the Dark theme and select OK.
We can switch between Light and Dark themes here

6. This is how WhatsApp looks in Dark Mode

Wednesday, February 26, 2020

100% Fix for 'mmc_read failed' error in Samsung Galaxy Note 4 and other devices

Some of the old devices might have started to get an error 'mmc_read failed' and fails to boot randomly. As the time goes by, this issue becomes more prominent and makes the device completely useless.

The error looks as follows:
Could not do normal boot.
ddi : mmc_read failed
ODIN MODE (HIGH SPEED)
PRODUCT NAME: SM-N9100
CURRENT BINARY: Samsung Official
SYSTEM STATUS: Custom
REACTIVATION LOCK: Off
KNOX WARRANTY VOID: 0x1 (0)
QUALCOM SECUREBOOT: ENABLE (CSB)
RP SWREV: S1, T1, R1, A1, P1
SECURE DOWNLOAD : ENABLE
UDC START
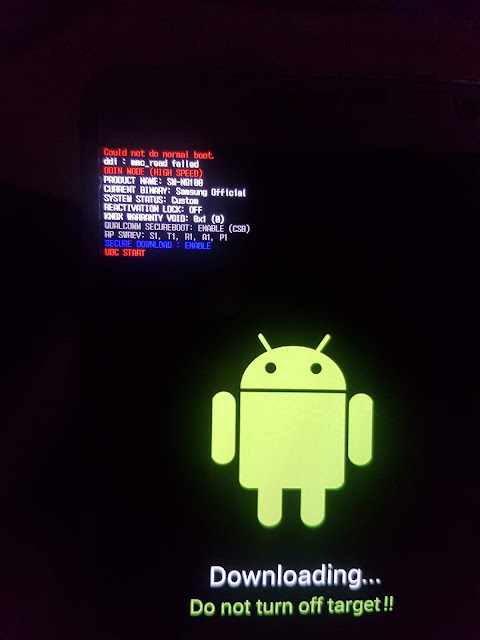
'mmc_read failed' error in Download mode

Note: The PRODUCT NAME and RP SWREV changes based on the different Galaxy Note 4 models or other phone models

The symptoms of a mmc read fail are:
  • Phone goes directly to download mode by switching it on
  • Displays the error message 'ddi : mmc_read failed' in the Download mode
  • Randomly boots to the Android
  • Doesn't boot into recovery(Stock or Custom like TWRP)
  • No indication of charging while plugged to a charger when phone is switched off
  • Heavy battery drain in some cases
  • Restarts often
  • Phone doesn't boot even after pressing the power button. Need to remove the battery for some good 15 to 20 minutes and then insert it and switch on to at least boot into download mode
  • Flashing stock or custom ROMs in the download mode via ODIN always fails
  • Gets 'No PIT Partition found' error while flashing things like recovery, boot img, etc via ODIN
  • As it gets worse, the phone stops booting completely and becomes useless but can be used as a paper weight

Fix:
Warning: This fix works for most devices when done by exactly following the steps with patience and concentration. Do at your own risk.

This fix is not related to the software but to the hardware itself. Don't get scared as it is just a small fix but needs patience and concentration to make it done!.
The mmc_read fail error arises due to few reasons but more than 90% of the cause would be that the processor cannot read the emmc chip due to poor contacts. So we gonna fix this issue by forcing the chip to make a tight contact with its terminals so that the processor can read data from the chip.


Lets get started 👍

1. Remove the battery and the back case.

2. There are totally 16 screws and remove all of them and store them carefully somewhere. There would be a screw which usually hidden under a sticker as pointed in the below image. Make sure to unscrew it as well.


3. Push the screen gently and slowly from the battery compartment of the phone as shown in the below image. The screen would pop out on the other side. Use a credit card to cut all the adhesive strings. Repeat this with patience and concentration all over the battery compartment to remove the screen completely. A razor blade may also be used to cut the adhesive strings that are strong.

Do not insert the credit card or blade between the screen and the electronic chip board sticking to it as it may break down the electronic connections.


4. Once the screen is removed off from the back case, the interior of the phone looks like as shown in the below image. In this, we need to remove a screw, two ribbon connections which are encircled in the below image. Apply a gentle force from the right side to remove the chip(indicated by arrows in the image).


5. Now the phone will look as shown in the below image and with reference to it,
A - This is the EMMC Chip which needs a push to make a good contact with its board.
B - This is where the actual fix is gonna happen. Take a piece of cardboard which is around 1 or 2 mm thick(we can get the cardboard from packaging boxes) and cut it to a size just less than or equal to the size of the EMMC chip. Stick the cardboard here with a drop of glue and make sure that the glue does not spill.
C1 and C2 - These are ribbon connectors that connects to the board on which EMMC chip is located. So to counter the height gained by the EMMC Chip, place a small rectangle shaped cardboard underneath these pins C1 and C2. The cardboards need not be glued here.

Cardboard box


6. Once the cardboards are in place then fit the chip-board(Indicated as D in the above image) back and make sure the cardboards does not move out of its place during this process. Give a gentle push on the board where those two ribbons C1 and C2 are located so that the ribbons gets connected to the board. You would hear a 'click' sound when C2 connects. Make sure to put the screw back near the SD card slot. This screw will make sure the cardboard underneath EMMC Chip does not move. 

7. Put the plastic case back and fix the 16 screws. Insert the battery and turn on. Done!

Troubleshooting:
If the phone does not turn on or the screen doesn't work then,
1. Make sure the ribbons C1 and C2 are properly connected to the board
2. Make sure the cardboard under the EMMC chip is properly placed
3. Make sure the battery holds the charge. If not then connect the phone to a charger


Monday, November 19, 2018

How to flash boot image file using ODIN

How to flash boot image file using ODIN

1. Get the stock boot image file for your device. To get the stock boot.img file download the latest firmware from sammobile or updato. Extract the file and you will get the files as shown in the below image.


2. The boot image file is contained in the file starting with AP_G935F........... So extract this file and you get boot.img as one of the files. Recent firmware files from Samsung uses a new compression method known as lz4 so if you end up some thing like boot.img.lz4 then you need to extract the lz4 file using 7zip. Now finally you will have boot.img. 

3. ODIN needs files in .tar format. So use 7zip and archive/compress to .tar format. You can even rename the file as boot.img.tar as shown in the below screenshot


4. Open ODIN and plug your phone to your computer via USB cable. Your phone should be detected by ODIN. Click the AP button and select the boot.img.tar file from your computer. Hit 'Start'. The flashing will be done in seconds as shown in the below screenshot.


Sunday, November 18, 2018

Systemless Root for Samsung Galaxy phones using Magisk

Systemless Root for Samsung Galaxy phones using Magisk


Brief Intro about Magisk:
Magic Mask is know as Magisk. “Systemless” root can be achieved by Magisk. It is a way to modify the system without actually modifying it. Modifications are done in a duplicate boot partition instead of modifying the real system files. Modifications are undetected by SafetyNet since the original files remains unchanged. This is an alternate for SuperSU. 

Let's get started 👍

Prerequisites:

  • Read this post at least twice before starting. You agree that you are performing this at your own risk.Warranty may be void. 
  • Take a full backup of your phone. Need to do a factory reset during the process.
  • Stock boot image file of your device
  • Magisk Manager
  • ODIN

This method is applicable for all Android phones and I am taking Samsung Galaxy S7 Edge as an example to show the demo. There are many ways available to root a phone but the way we are gonna achieve root does not require custom recovery. In other words, flashing Masigk without root and does not require a custom recovery. 

1. Get the stock boot image file for your device. I am taking Galaxy S7 Edge as an example here. Download the latest firmware from sammobile or updato. Extract the file and you will get some files as shown in the below image.


2. The boot image file is contained in the file starting with AP_G935F........... So extract this file and you get boot.img as one of the files. Recent firmware files from Samsung uses a new compression method known as lz4 so if you end up some thing like boot.img.lz4 then you need to extract the lz4 file using 7zip (get 7zip from here). Now finally you will have boot.img. 

Get the Stock boot image file for Samsung Galaxy S7 edge here or here

3. Now download the Magisk Manager. Get it here and install it in your device. 

4. Move the extracted boot.img file to your SD card

5. Open Magisk Manager and go to Settings -> Update Settings -> Patched Boot Output Format, and select .img.tar

6. Go to the homepage of the Magisk and select Install -> INSTALL -> Patch Boot Image File -> Select your stock boot image file(boot.img) from the SD card

7. Magisk Manager will now patch the boot image and stores in Internal Storage/Download/patched_boot.img.tar

8. Copy this patched_boot.img.tar file to your desktop

9. Download the latest ODIN from here

10. Put the phone in Download mode(For S7 Edge -> Press Home key + Power button + Volume down simultaneously and continue to Download mode) Connect the phone to the PC via USB cable and open ODIN

11. Your phone should be detected by ODIN. Click the AP button and select the patched_boot.img.tar file from your desktop. Hit 'Start'. The flashing will be done in seconds. Below image is for reference.


12. Your phone will now reboot and asks you to to do a reset. After Resetting, you are Done. 

13. Go to the app drawer and you can find the Magisk Manager. Open it and follow the on screen instructions which requests you to Install Magisk. 

14. Now your phone is rooted systemless-ly. You will still be eligible to receive official OTA updates. 

Note: You may receive a warning message by 'Device Security' as shown in the below screenshot. Do not restart phone from here. Ignore it. 


Sunday, August 19, 2018

How to Activate Dual Messenger such as Whatsapp, Telegram, Facebook in Samsung phones running Oreo


Having two Whatsapp, Facebook messenger accounts (and many more apps) is now easy with Dual Messenger. This allows us to use two different accounts in one chatting app. Samsung has given this as a default feature in the latest Oreo firmware. Not all apps are supported by Dual Messenger. Please check the compatible apps in the Dual Messenger settings itself.

Steps to install Dual Messenger in Galaxy phones and in other Samsung phones as well running Oreo. Check it out by performing the following steps.

1. Go to Settings and select 'Advanced features'


2. Tap on the 'Dual Messenger'


3. The next screen shows the available apps that can be installed again to use with a second account. The apps that includes Whatsapp, Facebook, Facebook messenger, Telegram, etc. Follow the on-screen instructions and you are done.


Wednesday, August 15, 2018

How to Root Samsung Galaxy Note 4 SM-N9100 Running 6.0.1 Marshmallow

This article provides you the steps to Root Samsung Galaxy Note 4 SM-N9100 running 6.0.1 Marshmallow. This is a Chinese model phone with the Marshmallow 6.0.1 as the latest update.

Below are the steps to gain root access for Samsung Galaxy Note 4 SM-N9100 :

  1. Download the CF Auto Root file for Note 4 SM-N9100 here 
  2. Unzip the CF-Auto-Root-....zip file
  3. If you end up with a recovery.img and cache.img file, you've extracted twice. You need to end up with a .tar.md5 file - do not extract this .md5 file
  4. Disconnect your phone from computer if you had connected
  5. Start Odin (ODIN version greater than 3 is recommended. Download latest ODIN here)
  6. Click the PDA button and select CF-Auto-Root-....tar.md5 file. Note that PDA is replaced by AP in newer versions of ODIN
  7. Put your phone in download mode (turn off phone, then hold Volume Down+Home+Power to boot. If it asks you to press a button to continue, press the listed button to continue to Download mode
Hold Volume Down+Home+Power to get to this screen. Press 'Volume up' button to continue

Download mode


       8. Connect the phone to your computer via USB. Make sure that you phone is charged above 80%
        9. Make sure Repartition is NOT checked
       10. Click the Start button
       11. Wait for Android to boot
       12. Done

Once the rooting is completed

Saturday, May 26, 2018

Installing Official Oreo 8.0 in Samsung Galaxy S7/S7 Edge

Samsung is delaying the release of Oreo 8.0 for Galaxy S7 and S7 Edge phones but some countries had tasted the flavor of Oreo 8.0.
So we are gonna try the Oreo 8.0 in our phones by flashing other countries' firmware. 
This is completely official ROM from Samsung and the features such as Samsung Pay, Knox, etc. works.

Make sure to follow the below steps carefully.

1. Backup all your data since it completely wipes out the data in the phone. Make sure the phone is charged over 60%

2. The models ending with D such as G930FD or G935FD are Indian variants which does not have Oreo yet. Go to the site https://www.sammobile.com/firmwares/ and search for your variant, say SM-G930F for S7 and SM-935F for S7 Edge. 

3. Select a country's firmware which has Oreo 8.0 (Say United Kingdom) and download the firmware file.

4. Download the latest ODIN from http://odindownload.com/

5. Extract or Unzip the firmware file into a folder. Avoid using winrar as it can cause errors. Use 7zip instead. The extracted files are shown in the below screenshot.


6. Run/Open ODIN as Administrator

7. Put the phone in download mode. Shutdown your phone. Press Power + Home + Volume down. A screen appears asking you whether to continue or not. Press Volume up to continue. Connect the phone to the computer via a good USB cable. The ODIN should show the it has detected your phone.

8. From the extracted firmware put the below files in ODIN. Click on the buttons BL, AP, CP,  CSC one by one and choose the respective files. The file to be chosen for BL will start with file name BL. The file to go for AP will start with the file name AP and so on as shown in the following image. 
Note: Select CSC instead of Home CSC

      BL
      AP
      CP
      CSC


9. Check the below options. (for this select Options tab).

F.reset time
Auto reboot

10. Check the below option as shown in the following image.

Re-partition


11.   Now click the Start button and wait until the ODIN shows PASS. The phone will now reboot.

12.   To receive OTA updates, after installing the firmware, put the phone into Recovery Mode and wipe cache then wipe data/factory reset.

To go to the recovery mode press Power + Home + Volume up button. Now select ‘Cache Partition’ and wipe it. Then ‘wipe data/factory reset’ and reboot your phone. 
You are done.