Showing posts with label Apps. Show all posts

Saturday, September 5, 2026

Brushed Metallic Icon Pack – Give Your Android Home Screen a Premium Metallic Look

If you love premium, elegant, and detailed Android home screens, the Brushed Metallic Icon Pack is designed for you. With 2,000+ beautifully crafted icons, the pack brings a distinctive metallic appearance to your favorite apps while keeping the overall home-screen aesthetic clean and sophisticated.


✨ A Unique Brushed Metallic Design

Every icon is designed with a brushed metal-inspired finish, realistic depth, subtle highlights, shadows, and carefully crafted textures. The result is a collection that feels more like a premium piece of hardware than a traditional flat app icon.

From everyday apps to utilities, games, social media, productivity tools, and more, the collection is continually expanding.

🎨 2,000+ Premium Icons

The pack currently includes 2,022+ brushed metallic icons, covering a wide range of popular Android applications.

The icons combine:

🩶 Brushed metallic textures

✨ Detailed highlights and shadows

🔩 Depth and dimensional effects

🎯 Consistent visual styling

📱 Designs optimized for modern Android devices


New icons are also added regularly, including user-requested apps.

📱 Designed for Modern Android

Brushed Metallic Icon Pack is designed to look great across different Android devices and screen sizes, including phones, tablets, foldable phones, and flip devices.

Whether you're using a traditional smartphone or a modern foldable, the metallic style gives your home screen a distinctive appearance.

🚀 Support for Popular Launchers

The icon pack works with many popular Android launchers, making it easy to customize your home screen.

You can use it with launchers such as Nova, One UI, Niagara, Lawnchair, and many others.

Simply apply the icon pack through your compatible launcher and give your home screen an entirely new look.

📩 Request Missing Icons

Can't find an icon for one of your favorite apps?

No problem!

The app includes an icon request feature, allowing you to request missing icons directly. User requests help guide future updates, so the collection continues to grow based on what users actually need.

🔄 Regular Updates

Brushed Metallic Icon Pack is an actively maintained project.

More icons, improved compatibility, and user-requested applications are added through regular updates. The goal is to keep expanding the collection while maintaining the same premium metallic design.

If you're looking for something different from the usual colorful or flat icon packs, Brushed Metallic Icon Pack offers a darker, sophisticated and industrial-inspired alternative.

With 2,000+ icons, detailed metallic designs, launcher compatibility, foldable support, and regular updates, it's built for Android users who want their home screen to stand out.

Ready to transform your Android home screen?

📥 Download Brushed Metallic Icon Pack


Wednesday, September 2, 2026

Glossy Glow Icon Pack - Customize Your Android

✨ Glossy Glow Icon Pack – Give Your Android Home Screen a Stunning New Look


Looking to give your Android phone a fresh, polished, and eye-catching appearance? Glossy Glow Icon Pack is designed for users who love shiny, vibrant and premium-looking app icons.

With its glossy finish, vibrant colors and subtle 3D appearance, the icon pack transforms ordinary app icons into a cohesive and stylish home-screen experience.

💎 What is Glossy Glow Icon Pack?

Glossy Glow Icon Pack is a premium Android icon pack featuring carefully designed glossy, shiny and dimensional app icons.

Each icon is created to have a distinctive polished appearance, with highlights, reflections and depth that give the icons a glass-like glossy glow.

Instead of having a collection of unrelated icons with different visual styles, Glossy Glow brings a more consistent look across your home screen and app drawer. 

🌟 Why Try Glossy Glow?

✨ Glossy & Shiny Design

The defining feature of the pack is its glossy visual style. Highlights and reflections are used to create a polished, almost 3D appearance.

🎨 Vibrant Colors

The icons are designed with rich and vibrant colors to make your home screen stand out while maintaining a consistent overall appearance.

🔮 3D-Style Depth

Subtle shading and highlights give many icons a dimensional appearance instead of looking completely flat.

📱 Designed for Android

Glossy Glow works with supported Android launchers and icon-pack-compatible home-screen setups. Apply the icon pack through your launcher to give your device a completely different look.

🖼️ Wallpapers

The app also includes wallpapers to complement the glossy icon style and help create a more complete home-screen setup.

📩 Request Icons

Can't find an icon for one of your apps?

Use the Icon Request feature inside the app. You can submit apps you'd like to see supported, helping guide future additions to the icon library.

⭐ Download Glossy Glow Icon Pack

👉 DOWNLOAD FROM GOOGLE PLAY

Monday, July 21, 2025

Cloning Windows OS to another Disk (SSD, HDD) as a bootable drive

Cloning the Windows operating system has become quite simple thanks to the availability of various user-friendly tools. In this article, we'll walk through the process of cloning Windows OS using WD's Acronis TrueImage software. The SSDs used in this demonstration are a Samsung 860 EVO 250GB SATA M.2 SSD and a WD Blue 2TB SATA M.2 SSD.

A key component in this setup is a SATA M.2 SSD to 2.5-inch SATA adapter. This adapter is essential because SATA M.2 represents an older SSD interface, which has become less common with the rise of NVMe SSDs that use PCIe instead of SATA. The adapter not only makes the SATA M.2 SSD compatible with modern systems by converting it into a standard 2.5-inch form factor, but also ensures it can be used in most desktops and many laptops.

Get the adapter here: https://amzn.to/3TRPqwy


M.2 SATA & mSATA SSD to 2.5inch SATA3.0 Adapter Converter 


Need a USB to 2.5 inch SATA adapter wire to connect it to the computer via USB port. 

Get the USB 3.0 to SATA adapter: https://amzn.to/44Ew8Ro

USB 3.0 to SATA adapter


Step 1: Install the Acronis software (Get the download link from google). Open it. Select TOOLS and then click on 'Clone Disk'


Step 2: Select 'Automatic' clone mode


Step 3: Select the source disk (Samsung 860EVO 250GB, in this case)


Step 4: Select the destination disk to which the OS to be cloned (WD 2TB SSD, in this case)


Step 5: Verify the disks chosen


Step 6: Wait for few hours without disturbing and the clone will be completed successfully. 


Step 8: Once cloning is done, remove the old SSD from the computer and insert the new cloned SSD. Booth the computer and it should work as it was previously. 

Comment if you faced any issue or need any help


Saturday, May 2, 2020

Free Unlimited Cloud Backup for Photos and Videos


Most of the latest smartphones which we own now captures photos / videos at a very high resolution that can occupy more space. Even the videos shot at Full HD eats a lot of space on phone's memory or sd card. No need to say specific about 4K videos!.

So what is the app that gives unlimited free backup space?. Answer is Google Photos

This app gives an option to upload / sync unlimited photos and videos at high resolution. The app just syncs all the photos and videos from your phone to the google server and the synced photos and videos can be accessed from any device, anywhere, via any browser, anytime by hitting photos.google.com
Deleting the photos from the phone will not delete the copy from the google server. 

There are three quotas available as follows,

1. Original quality - Backs up media at Original resolution which counts against the 15 GB google storage space. It allows us to buy more storage if we had crossed the 15 GB limit

2. High quality - Unlimited free backup at High resolution. Photos are compressed to 16 MP, Videos are compressed to high definition

3. Express - Unlimited free backup at Reduced resolution. Photos are compressed to 3 MP, Videos are compressed to standard definition


Some of the useful features of the Google Photos app

1. Acts as a gallery
2. Frees up space
3. Creates smart albums automatically
4. Advanced photo editing
5. Sharing
6. Smart and powerful search
7. Allows to link many phones under same google account and so on...


Wednesday, April 8, 2020

How to disable auto download of media in Telegram ?


As soon as we login to the Telegram app, we can notice that the media gets auto downloaded as we browse through the chats/groups/channels. 

The auto download of media files can be controlled in the Settings. Here is how to do it.

1. Open Telegram and tap on the hamburger icon at the top left and tap on Settings


2. On the Settings, tap on the 'Data and Security'

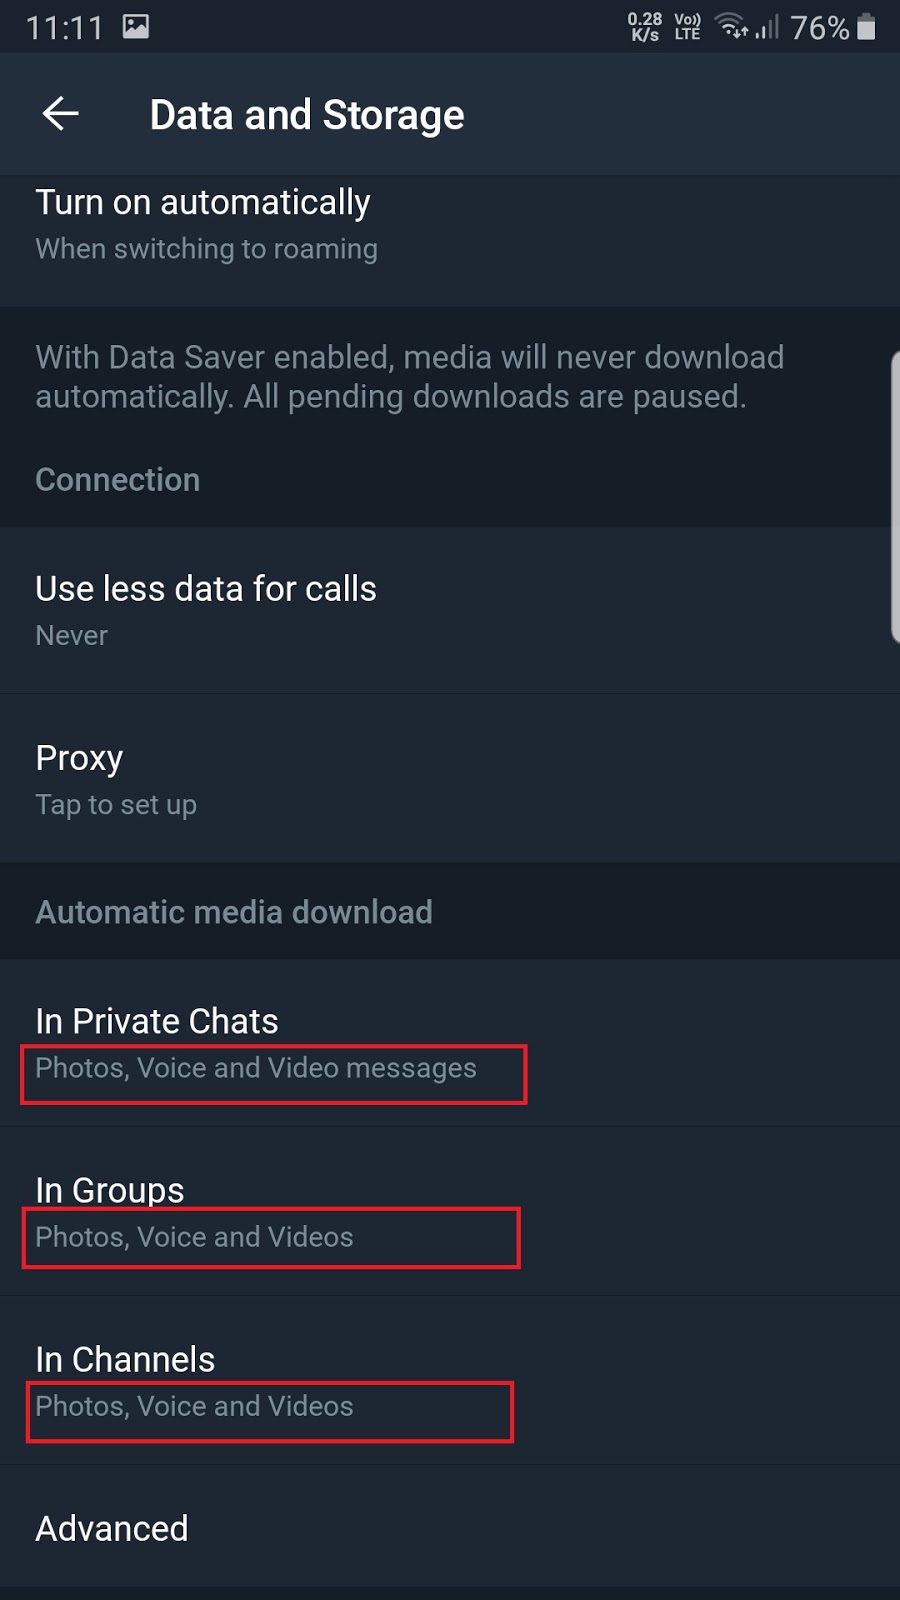
3. Scroll down to the section 'Automatic media download'. Here we can see the media that are set to be auto downloaded for Private Chats, Groups, Channels


4. Tap on it and deselect all the check boxes and tap on SAVE


5. Once all the check boxes are disabled for Private Chats, Groups and Channels then it should show 'Nothing' as shown in the below image. 

Done!. None of the media file gets downloaded automatically now but can be downloaded manually by tapping on the image/video/file/document


Friday, March 20, 2020

How to enable Dark Mode in WhatsApp ?

Enabling Dark Mode in WhatsApp is very simple as shown in the below steps.


1. Open WhatsApp and tap on the three dot menu on the top right

2. Tap on Settings

3. Tap on the Chats
 
4. Tap on the Theme

5. Now a popup would be displayed to select the Dark theme and select OK.
We can switch between Light and Dark themes here

6. This is how WhatsApp looks in Dark Mode

Tuesday, February 5, 2019

4k60 Camera Mod for Samsung Exynos devices


I have come across this mod recently and found to be very interesting. The mod makes the Exynos based Samsung devices to use their full potential of the hardware to capture some of the best videos and photos. This mod can be installed only on Stock based Samsung Experience ROMs with Magisk. All the credit goes to the developer Cvolton. 


Videos:
The Galaxy S7 Edge stock camera allows to take 4K videos at 30 fps, FHD at 60 fps max whereas this mod allows to capture 4K UHD resolution videos at 60 fps, FHD videos at even 120 and 240 fps and even more. Some of the UHFR resolutions may not work in some devices.


Resolutions available for Videos


The additional Mod Settings can be found in the camera settings as shown in the below screenshot. Allows user to change the Video encoders, Audio bitrates and Video bitrates as they require.


Type of Video Encoders available are H.263, H.264, MPEG-4 Visual and H.265


Audio bit rates ranges from 64 Kbps to 320 Kbps


Video bitrate ranges from 500 Kbps to whooping 200 Mbps


Photos:
The interesting part in the photos is that it's Pro mode. This gives an excellent improvement for the users who use this mode more frequently. 

  • The limit of the ISO is increased to 6400.
  • Shutter speed is scaled up to 90 seconds for long exposure shots (It is 2 or 4 seconds in the stock camera)
  • Shutter speed is also lowered to 1/24000 seconds (It is 1/30 seconds in the stock camera)
  • Unlocked Pro mode in the front cam


Requirements/Compatibility:
  • Magisk 17+
  • Samsung Experience stock based ROM
  • Supported devices are Samsung Galaxy S7 & S7 Edge, Galaxy S8 and S8+, Galaxy Note 8
  • Devices with different sensor resolution than 4032x3024 require a manual modification of a .xml file

Installation instructions:
  • Install the zip via Magisk --> Downloads and search for 'Samsung 4k60 Camera Mod'
  • Clear the ShootingModeProvider's data
  • Install the zip based on the Hardware of the device and not on the type of ROM running


How to Install Magisk?
Click here and follow the instructions to Install Magisk on your Samsung Devices


Sunday, August 19, 2018

How to Activate Dual Messenger such as Whatsapp, Telegram, Facebook in Samsung phones running Oreo


Having two Whatsapp, Facebook messenger accounts (and many more apps) is now easy with Dual Messenger. This allows us to use two different accounts in one chatting app. Samsung has given this as a default feature in the latest Oreo firmware. Not all apps are supported by Dual Messenger. Please check the compatible apps in the Dual Messenger settings itself.

Steps to install Dual Messenger in Galaxy phones and in other Samsung phones as well running Oreo. Check it out by performing the following steps.

1. Go to Settings and select 'Advanced features'


2. Tap on the 'Dual Messenger'


3. The next screen shows the available apps that can be installed again to use with a second account. The apps that includes Whatsapp, Facebook, Facebook messenger, Telegram, etc. Follow the on-screen instructions and you are done.


Tuesday, January 23, 2018

One Click Root for Android devices running 7.0/7.1 Nougat


Root your phone On The Go!!
This is the simplest way ever to root your latest android devices running 7.0/7.1 Nougat. Rooting this way doesn't require a PC and can be carried out even by a newbie. 

Note: Rooting may void your device warranty. 

Steps:
1. Download the Kingroot apk here
2. If there are some warnings about the file as shown in the below image, click 'OK' to proceed


3. Now go to Settings > Security > Unknown sources > Check the box and allow


4. Go to Settings > Security > Verify apps > Uncheck it
5. Install the downloaded apk in your android device
6. Open the app and it looks like the below image. 


7. Tap the icon of Kingroot and tap on 'One Click Root'. Note that a stable internet connection is required while you perform this action. 
8. You will get the result success or fail. Try it few more times if you saw Fail message since the app runs one script at a time. Running it few more times increases the chances of root. 


Put down your comments whether you had succeeded with root on your device or faced any other issues. 


Sunday, June 4, 2017

How to use Multiple Accounts in Apps such as Whatsapp, Facebook in Android phone without the use of third party apps

If you own a Samsung Galaxy phone running Android 7.0 or later then you are ready to use this feature. This is called Secure Folder which comes preloaded in Galaxy S7, S7 Edge, S8 and S8+ devices. Samsung plans to extend support to additional devices shortly. 

Samsung officially released a downloadable version of secure folder that can be downloaded and installed in your Android phone running 7.0 or later. Get the apk here

It creates a secured platform to store your files and apps. This feature can be used to create multi accounts of apps such as Whatsapp, Facebook, Twitter, Viber, Telegram, etc. Most of us use a dual sim phone nowadays so the Secure Folder would be really helpful to have multiple accounts of the above said apps and even more.

Lets get started.

1. Install the Secure Folder app. If the app is already preloaded then just simply turn it on from the quick tiles as shown in the below image.


2. Now, a Secure Folder icon will be visible on the home screen. Open it.


3. If you have not setup for Secure Folder then go ahead with the steps for the setup. Open the Secure Folder once the initial setup is done. It asks for your fingerprint or pattern or pin or password to open.


4. After identifying yourself with one of the secured ways, the app enters into the Secure Folder. As you can see in the below image there are some default apps available. 


5. If you wanna add some apps then just click 'Add apps' and add an app from the list or install it from the play store. I have added Whatsapp from the list as illustrated in the below image.


6. Now Whatsapp appears among other apps in the secure folder list. Similarly, it allows you to add other apps that you wish. Data such as Images, Files, Videos, Chats, etc. contained in the Secure Folder will not be visible outside of secured folder. Apps can be installed and uninstalled inside the Secure Folder without affecting the apps outside of the Secure Folder. This acts as a separate secured space.


7. Clicking on Whatsapp in the Secure Folder opens the app from the beginning to accept the terms and conditions followed by registration as so on. So now you have multiple Whatsapp account in a single phone without any third party apps that consume more resources. 


Monday, May 8, 2017

Battery Charge Limit app

Now we have an app which stops charging once it reaches 80%. Pretty good one to use to have a good battery life.

Prerequisite:
This app required a rooted phone running android 4.4 or higher

Instructions:
  1. Install the app from here
  2. Enable the limit in the app.
  3. Change the charging limit as you desire. Default and recommended value is 80.
  4. The app starts to work only when a charger is connected and stops working once the charger is unplugged. So this apps works only when the phone is connected to a charger and does not affect the battery.
  5. If the phone is not charging after disabling the limit then uninstall the app and reboot the device. After reboot the charging should work normal.
  6. Before uninstalling the app, disable the limit and then uninstall.

Wednesday, March 15, 2017

Installing third party themes in Samsung Galaxy S7, S7 edge, etc..

Third party themes that are installed will be usable only for 5 minutes in the devices like Galaxy S7, S7 edge, etc.. Try this technique to keep the theme forever but restarting the phone will set the default theme. Redo the same steps to keep the theme forever.

Steps:
1. Install the theme (Themes can be downloaded from various sources. Check the Galaxy Apps or xda forum for nice themes)
2. Check the 'Unkown sources' under Security options from Settings. This will allow installation of apks.
3. Install the app 'Package Disabler Premium' from Play Store.
4. Open the Package Disabler Premium app.
5. Search for keyword 'theme' and check the options that are displayed as shown below. This action will disable the apks related to the theme.


6. Now select each option and clear data. Select 'Samsung Themes' and clear data. Select 'Themes' and clear data. Refer the screenshots shown below.


7. Cear the Recents and you are done.

Share your comments below if you succeeded or faced any issue in following the steps.