Friday, March 20, 2020

How to enable Dark Mode in WhatsApp ?

Enabling Dark Mode in WhatsApp is very simple as shown in the below steps.


1. Open WhatsApp and tap on the three dot menu on the top right

2. Tap on Settings

3. Tap on the Chats
 
4. Tap on the Theme

5. Now a popup would be displayed to select the Dark theme and select OK.
We can switch between Light and Dark themes here

6. This is how WhatsApp looks in Dark Mode

Wednesday, February 26, 2020

100% Fix for 'mmc_read failed' error in Samsung Galaxy Note 4 and other devices

Some of the old devices might have started to get an error 'mmc_read failed' and fails to boot randomly. As the time goes by, this issue becomes more prominent and makes the device completely useless.

The error looks as follows:
Could not do normal boot.
ddi : mmc_read failed
ODIN MODE (HIGH SPEED)
PRODUCT NAME: SM-N9100
CURRENT BINARY: Samsung Official
SYSTEM STATUS: Custom
REACTIVATION LOCK: Off
KNOX WARRANTY VOID: 0x1 (0)
QUALCOM SECUREBOOT: ENABLE (CSB)
RP SWREV: S1, T1, R1, A1, P1
SECURE DOWNLOAD : ENABLE
UDC START
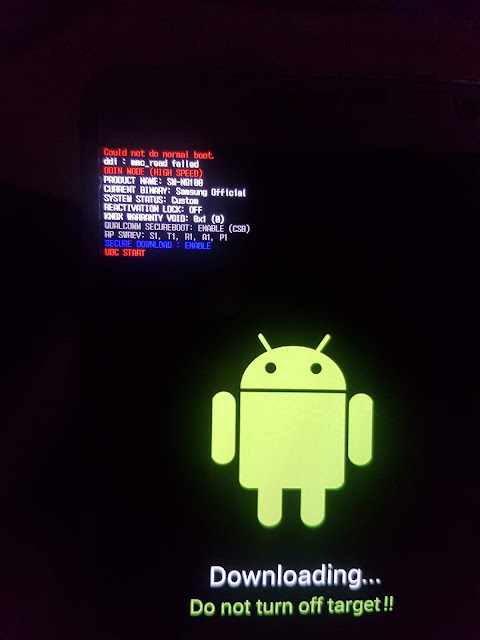
'mmc_read failed' error in Download mode

Note: The PRODUCT NAME and RP SWREV changes based on the different Galaxy Note 4 models or other phone models

The symptoms of a mmc read fail are:
  • Phone goes directly to download mode by switching it on
  • Displays the error message 'ddi : mmc_read failed' in the Download mode
  • Randomly boots to the Android
  • Doesn't boot into recovery(Stock or Custom like TWRP)
  • No indication of charging while plugged to a charger when phone is switched off
  • Heavy battery drain in some cases
  • Restarts often
  • Phone doesn't boot even after pressing the power button. Need to remove the battery for some good 15 to 20 minutes and then insert it and switch on to at least boot into download mode
  • Flashing stock or custom ROMs in the download mode via ODIN always fails
  • Gets 'No PIT Partition found' error while flashing things like recovery, boot img, etc via ODIN
  • As it gets worse, the phone stops booting completely and becomes useless but can be used as a paper weight

Fix:
Warning: This fix works for most devices when done by exactly following the steps with patience and concentration. Do at your own risk.

This fix is not related to the software but to the hardware itself. Don't get scared as it is just a small fix but needs patience and concentration to make it done!.
The mmc_read fail error arises due to few reasons but more than 90% of the cause would be that the processor cannot read the emmc chip due to poor contacts. So we gonna fix this issue by forcing the chip to make a tight contact with its terminals so that the processor can read data from the chip.


Lets get started 👍

1. Remove the battery and the back case.

2. There are totally 16 screws and remove all of them and store them carefully somewhere. There would be a screw which usually hidden under a sticker as pointed in the below image. Make sure to unscrew it as well.


3. Push the screen gently and slowly from the battery compartment of the phone as shown in the below image. The screen would pop out on the other side. Use a credit card to cut all the adhesive strings. Repeat this with patience and concentration all over the battery compartment to remove the screen completely. A razor blade may also be used to cut the adhesive strings that are strong.

Do not insert the credit card or blade between the screen and the electronic chip board sticking to it as it may break down the electronic connections.


4. Once the screen is removed off from the back case, the interior of the phone looks like as shown in the below image. In this, we need to remove a screw, two ribbon connections which are encircled in the below image. Apply a gentle force from the right side to remove the chip(indicated by arrows in the image).


5. Now the phone will look as shown in the below image and with reference to it,
A - This is the EMMC Chip which needs a push to make a good contact with its board.
B - This is where the actual fix is gonna happen. Take a piece of cardboard which is around 1 or 2 mm thick(we can get the cardboard from packaging boxes) and cut it to a size just less than or equal to the size of the EMMC chip. Stick the cardboard here with a drop of glue and make sure that the glue does not spill.
C1 and C2 - These are ribbon connectors that connects to the board on which EMMC chip is located. So to counter the height gained by the EMMC Chip, place a small rectangle shaped cardboard underneath these pins C1 and C2. The cardboards need not be glued here.

Cardboard box


6. Once the cardboards are in place then fit the chip-board(Indicated as D in the above image) back and make sure the cardboards does not move out of its place during this process. Give a gentle push on the board where those two ribbons C1 and C2 are located so that the ribbons gets connected to the board. You would hear a 'click' sound when C2 connects. Make sure to put the screw back near the SD card slot. This screw will make sure the cardboard underneath EMMC Chip does not move. 

7. Put the plastic case back and fix the 16 screws. Insert the battery and turn on. Done!

Troubleshooting:
If the phone does not turn on or the screen doesn't work then,
1. Make sure the ribbons C1 and C2 are properly connected to the board
2. Make sure the cardboard under the EMMC chip is properly placed
3. Make sure the battery holds the charge. If not then connect the phone to a charger


Friday, January 17, 2020

The Best Stable Custom ROM for Samsung Galaxy S7 / S7 Edge


About Galaxy S7 / S7 Edge:
It's been around four years now (2020) since Galaxy S7 / S7 Edge released but it can still compete with the current generation new phones. The hardware is almost equal to the phones that are coming out in 2020. The Camera quality is still one of the best among the latest phones. 4 GB RAM, Power-efficient Exynos / Snapdragon quad-core / octa-core processor, 12 MP camera capable of shooting 4K videos, Fingerprint sensor, Heart rate monitor, Water-resistant and many more. 

Official firmware update:
Usually, the phone manufacturers provide firmware support for 2 years from the launch of the phone but S7 / S7 Edge has got support even in December 2019. Yes, the latest firmware released for S7 / S7 Edge is in December 2019 but it is still on Android 8.0 Oreo. It is very unlikely that S7 / S7 Edge will get further major Android 9 or 10 updates. 

Custom ROMs:
Custom ROMs are firmware that is developed by many good-hearted Android developers out there. There are plenty of Custom ROMs for S7 / S7 Edge on the Internet and depending on the requirements one can choose the AOSP(pure Android) or Touchwiz(Samsung) ROMs. 
An important thing to note is that flashing a custom ROM will void the warranty. If you had purchased the phone a year ago then feel free to try out these ROMs at your own risk. Being cautious while trying out the steps to flash will reduce the risk. 


Now lets come to the point. Out of all the ROMs that I have tried, the best stable custom ROM for the S7 / S7 Edge is the BlackDiamond N8 Port. 


It is based on Samsung Touchwiz ported from Galaxy Note 8 with Android PIE 9.0.0 and Samsung ONE UI developed by KiLL-SwitCH
I have been using this ROM (V2.0) for around five months and it is butter smooth without any lags or restarts, highly stable, works flawlessly even when the internal storage is 100% full, excellent RAM management, runs high end games and apps flawlessly, supports VoLTE.
There is a latest version V5.1 available but I haven't updated to it since the version V2.0 itself is very stable. Recommeded to use as a daily driver and never leaves you disappointed. 


Installation Steps:

Compatible devices are G935X/G930X

1. Prerequisite of TKKG, AJ's latest official TWRP recovery or any TWRP recovery based on them.
2. Boot into Recovery by pressing and holding Volume UP + Power + Home buttons together and as soon as you see Galaxy S7 Boot logo, release all three buttons.
3. Wipe System/Data/Cache/Dalvik.Wiping internal storage would be even better.
4. Choose the downloaded ROM zip file and flash it. Choose Clean wipe too in Aroma. Choose your options in the Aroma installer.
5. Reboot.
6. Give sometime for the ROM to boot. First boot may take 5 to 10 minutes.

Download TKKG TWRP for S7 and S7 Edge
S7 img flashable: https://mega.nz/#!xEdWwYQZ!IdTYbSyUz...bwP3P-mkcJCelo
S7 odin flashable: https://mega.nz/#!tMVCBYrB!Bcvd2tGuv...5qe_zCOSLX_-rA
S7e img flashable: https://mega.nz/#!oFd2RIpa!M2JYNFiur...-yMXx8eMHhBZ7I
S7e odin flashable: https://mega.nz/#!4JcmXKpK!BANHL1q1Z...4EFn84C413BJuY

Download BlackDiamond N8 ROM
V2.0
V5.1 - Mega
V5.1 - GDrive


Camera Mod - Samsung 4K60 Camera Mod

Stock camera works perfectly fine but there is camera mod out there which outperforms most of the latest high end devices. This mod will allow to shoot video at 4K UHD at 60 fps, the PRO mode is tweaked to have the maximum shutter speed of 1/24000 of a second and ISO at 6400 max.  

Get the Camera 4K60 Camera Mod here


Tuesday, February 5, 2019

4k60 Camera Mod for Samsung Exynos devices


I have come across this mod recently and found to be very interesting. The mod makes the Exynos based Samsung devices to use their full potential of the hardware to capture some of the best videos and photos. This mod can be installed only on Stock based Samsung Experience ROMs with Magisk. All the credit goes to the developer Cvolton. 


Videos:
The Galaxy S7 Edge stock camera allows to take 4K videos at 30 fps, FHD at 60 fps max whereas this mod allows to capture 4K UHD resolution videos at 60 fps, FHD videos at even 120 and 240 fps and even more. Some of the UHFR resolutions may not work in some devices.


Resolutions available for Videos


The additional Mod Settings can be found in the camera settings as shown in the below screenshot. Allows user to change the Video encoders, Audio bitrates and Video bitrates as they require.


Type of Video Encoders available are H.263, H.264, MPEG-4 Visual and H.265


Audio bit rates ranges from 64 Kbps to 320 Kbps


Video bitrate ranges from 500 Kbps to whooping 200 Mbps


Photos:
The interesting part in the photos is that it's Pro mode. This gives an excellent improvement for the users who use this mode more frequently. 

  • The limit of the ISO is increased to 6400.
  • Shutter speed is scaled up to 90 seconds for long exposure shots (It is 2 or 4 seconds in the stock camera)
  • Shutter speed is also lowered to 1/24000 seconds (It is 1/30 seconds in the stock camera)
  • Unlocked Pro mode in the front cam


Requirements/Compatibility:
  • Magisk 17+
  • Samsung Experience stock based ROM
  • Supported devices are Samsung Galaxy S7 & S7 Edge, Galaxy S8 and S8+, Galaxy Note 8
  • Devices with different sensor resolution than 4032x3024 require a manual modification of a .xml file

Installation instructions:
  • Install the zip via Magisk --> Downloads and search for 'Samsung 4k60 Camera Mod'
  • Clear the ShootingModeProvider's data
  • Install the zip based on the Hardware of the device and not on the type of ROM running


How to Install Magisk?
Click here and follow the instructions to Install Magisk on your Samsung Devices


Saturday, January 5, 2019

Install Magisk (The System-less Root) in Galaxy S7/S7 Edge Exynos


Note: Take a complete backup of your data. There may be a chance to erase internal memory if required. This will void warranty. I am not responsible to any harm done to your device. You should know what you are doing. Follow the steps carefully. 

Get the TWRP for Galaxy S7 (Exynos) here
Get the TWRP for Galaxy S7 Edge (Exynos) here
Get latest Magisk zip here
Get latest Odin here
Get Encryption Disabler here

1) Go to Settings and enable the Developer Options (Keep tapping on the ‘Build number’ and you will find the Developer Options visible under Settings). Now enable “USB Debugging” and "OEM unlocking" if available

2) Transfer the Magisk zip file, TWRP tar file and the Encryption Disabler zip file into the SD card

3) Shut down your phone and hold Power button + Home button + Volume down simultaneously until you see some text on the screen. Now press “Volume up” button to enter the phone into Download Mode

4) Connect the phone into the PC USB port directly via USB cable. Avoid USB hubs

5) Open Odin and load the TWRP tar file (****.img.tar) in the AP section. Disable 'Auto Reboot'. Hit 'Start' button 

6) Once you see ‘Done’ or ‘Success’ in Odin, hold the Power + Home + Volume down buttons and once it leaves the Download Mode, change from volume down to volume up while holding other buttons

7) Press/Select "keep system read only" in order to Keep the Safety Net

8) In case you can’t read the internal storage of the phone (check that by pressing on install and checking internal storage), go to format-->format data and type yes. It explains there that, by doing so, you will remove encryption. This will erase the internal memory data.

9) Now tap on ‘Install’ and flash the Encryption Disabler zip file and then the Magisk zip file.

10) Clear Cache/Dalvik if requested and Reboot. Done!!!